
Boosting Your Motorhome Off-Grid Capability with a Jackery Solar Generator
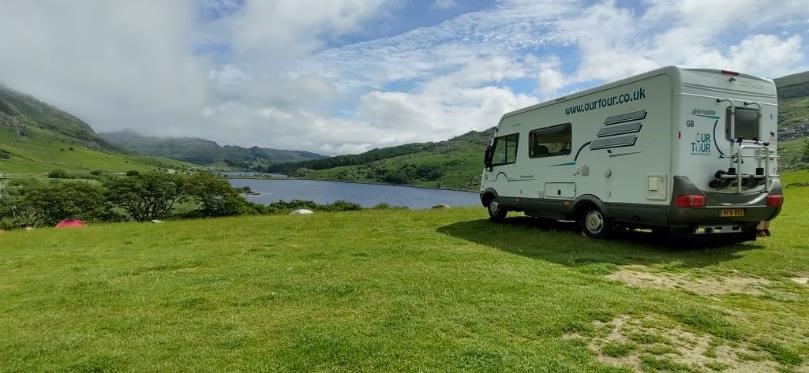
We’ve recently boosted our motorhome’s off-grid capability! How? With a Jackery Explorer 1000 Solar Generator and two of their 100W SolarSaga portable solar panels. If you stay on campsites which don’t have electrical hook-up, like to wild camp, use BritStop locations or aires, this kit might be of interest to you.
Disclosure
Jackery gave us this equipment for free, we didn’t pay for it. We’re under no obligation to write a positive review though, read-on to see how impartial you think we’ve been.
We weren’t the first bloggers to get given Jackery stuff, not by a long shot! They seem to use vloggers heavily for marketing (cheaper and more targeted than other forms of advertising maybe?), and if you search YouTube for Jackery Explorer 1000, or Jackery SolarSaga, you’ll find a ton of other reviews. There’s a good technical one here, although it’s focussed on the US version so has three 110V sockets. I’ve watched several of them, and they were all good and gave me ideas about how we could use the kit in future.
We won’t go into massive technical detail here, physically pulling the equipment apart or trying to run a huge electrical heater with it, as some reviewers have done. Instead, we’ll come at it more from the perspective of a motorhome or campervan owner in the UK, planning to holiday or tour on our native islands or maybe across Europe. From our time on the road we’ve some idea how useful this kind of kit might be and in what circumstances.
Jackery on Amazon UK
We’ve also provided links to the Jackery UK store on Amazon and other Amazon products – if you use these you pay Amazon’s usual price but we get a commission.
- Explorer 1000 – details here on Amazon
- SolarSaga 100W Panels – details here on Amazon
- Explorer 500 – details here on Amazon
- Explorer 240 – details here on Amazon
We Admit, We’re Sceptical
We’ll fess up: we’re sceptical about this kind of equipment. Our van has two 86Ah lead-acid batteries, which are a few years old so will have lost maybe 20 or 30% of their capacity by now. We’ve a 100W solar panel fixed on the roof to keep the batteries topped up and a cheap 300W pure sine inverter we use to recharge laptops, phones and Kindles and run mains-powered hair clippers. That’s been enough for us, including months of full-time travel through all seasons, spending some time on hook-up and lots of time ‘off-grid’.
When Jackery first wrote to us, we wrote back and said thanks, but no thanks. The Explorer looked heavy and bulky (taking up storage space and payload), and the SolarSaga panels looked difficult for most people to get much use from (easy to nick, awkward to store, not rainproof). The kit also looked expensive to us, at around £1,000 for the Explorer and £250 each for the panels.
Over the years we’ve developed very frugal power usage habits, monitoring the voltage of our batteries several times a day when we’re in the van. When we think about it though, we *might* just have become a tad too careful over power use though? It *might* be nice to use a coffee machine, blender or 12V electric seat heaters when sat sat outside in the cooler months. Or maybe to worry less about having the van’s blown air heating fan or TV on for too long at night. Hmmmm.
Jackery wrote back to say “We have worked with many motorhome bloggers and they speak highly about our products. There is no doubt that the brand is popular among the motorhome community as well.” Hmmmm again, maybe we were just being too tight with our money and electrical use? Maybe other motorhome and campervanners would love this stuff to get more convenient off-grid power?
We pulled up Amazon again and checked the reviews on both:
- Amazon.com – there are more reviews here as Jackery only initially sold into the US market – see the reviews US here.
- Amazon.co.uk – useful to get a UK perspective on the kit (where we’re not all driving a pick-up through the Nevada Desert) – see the UK reviews here.
A ton of 5 star ratings popped up, hundreds or even thousands of them. Folks seem to love the stuff, and the company too. That pursuaded us to commit to reviewing the kit.
OK, So What is The Jackery Explorer 1000?
Popping the marketing spiel to one side for a moment, it’s a plastic box containing a rechargeable battery. You can use it to charge your gadgets and, using a built-in inverter, can run some types of mains-powered equipment.
That’s it in a nutshell, but maybe not doing justice to the engineers who developed it!
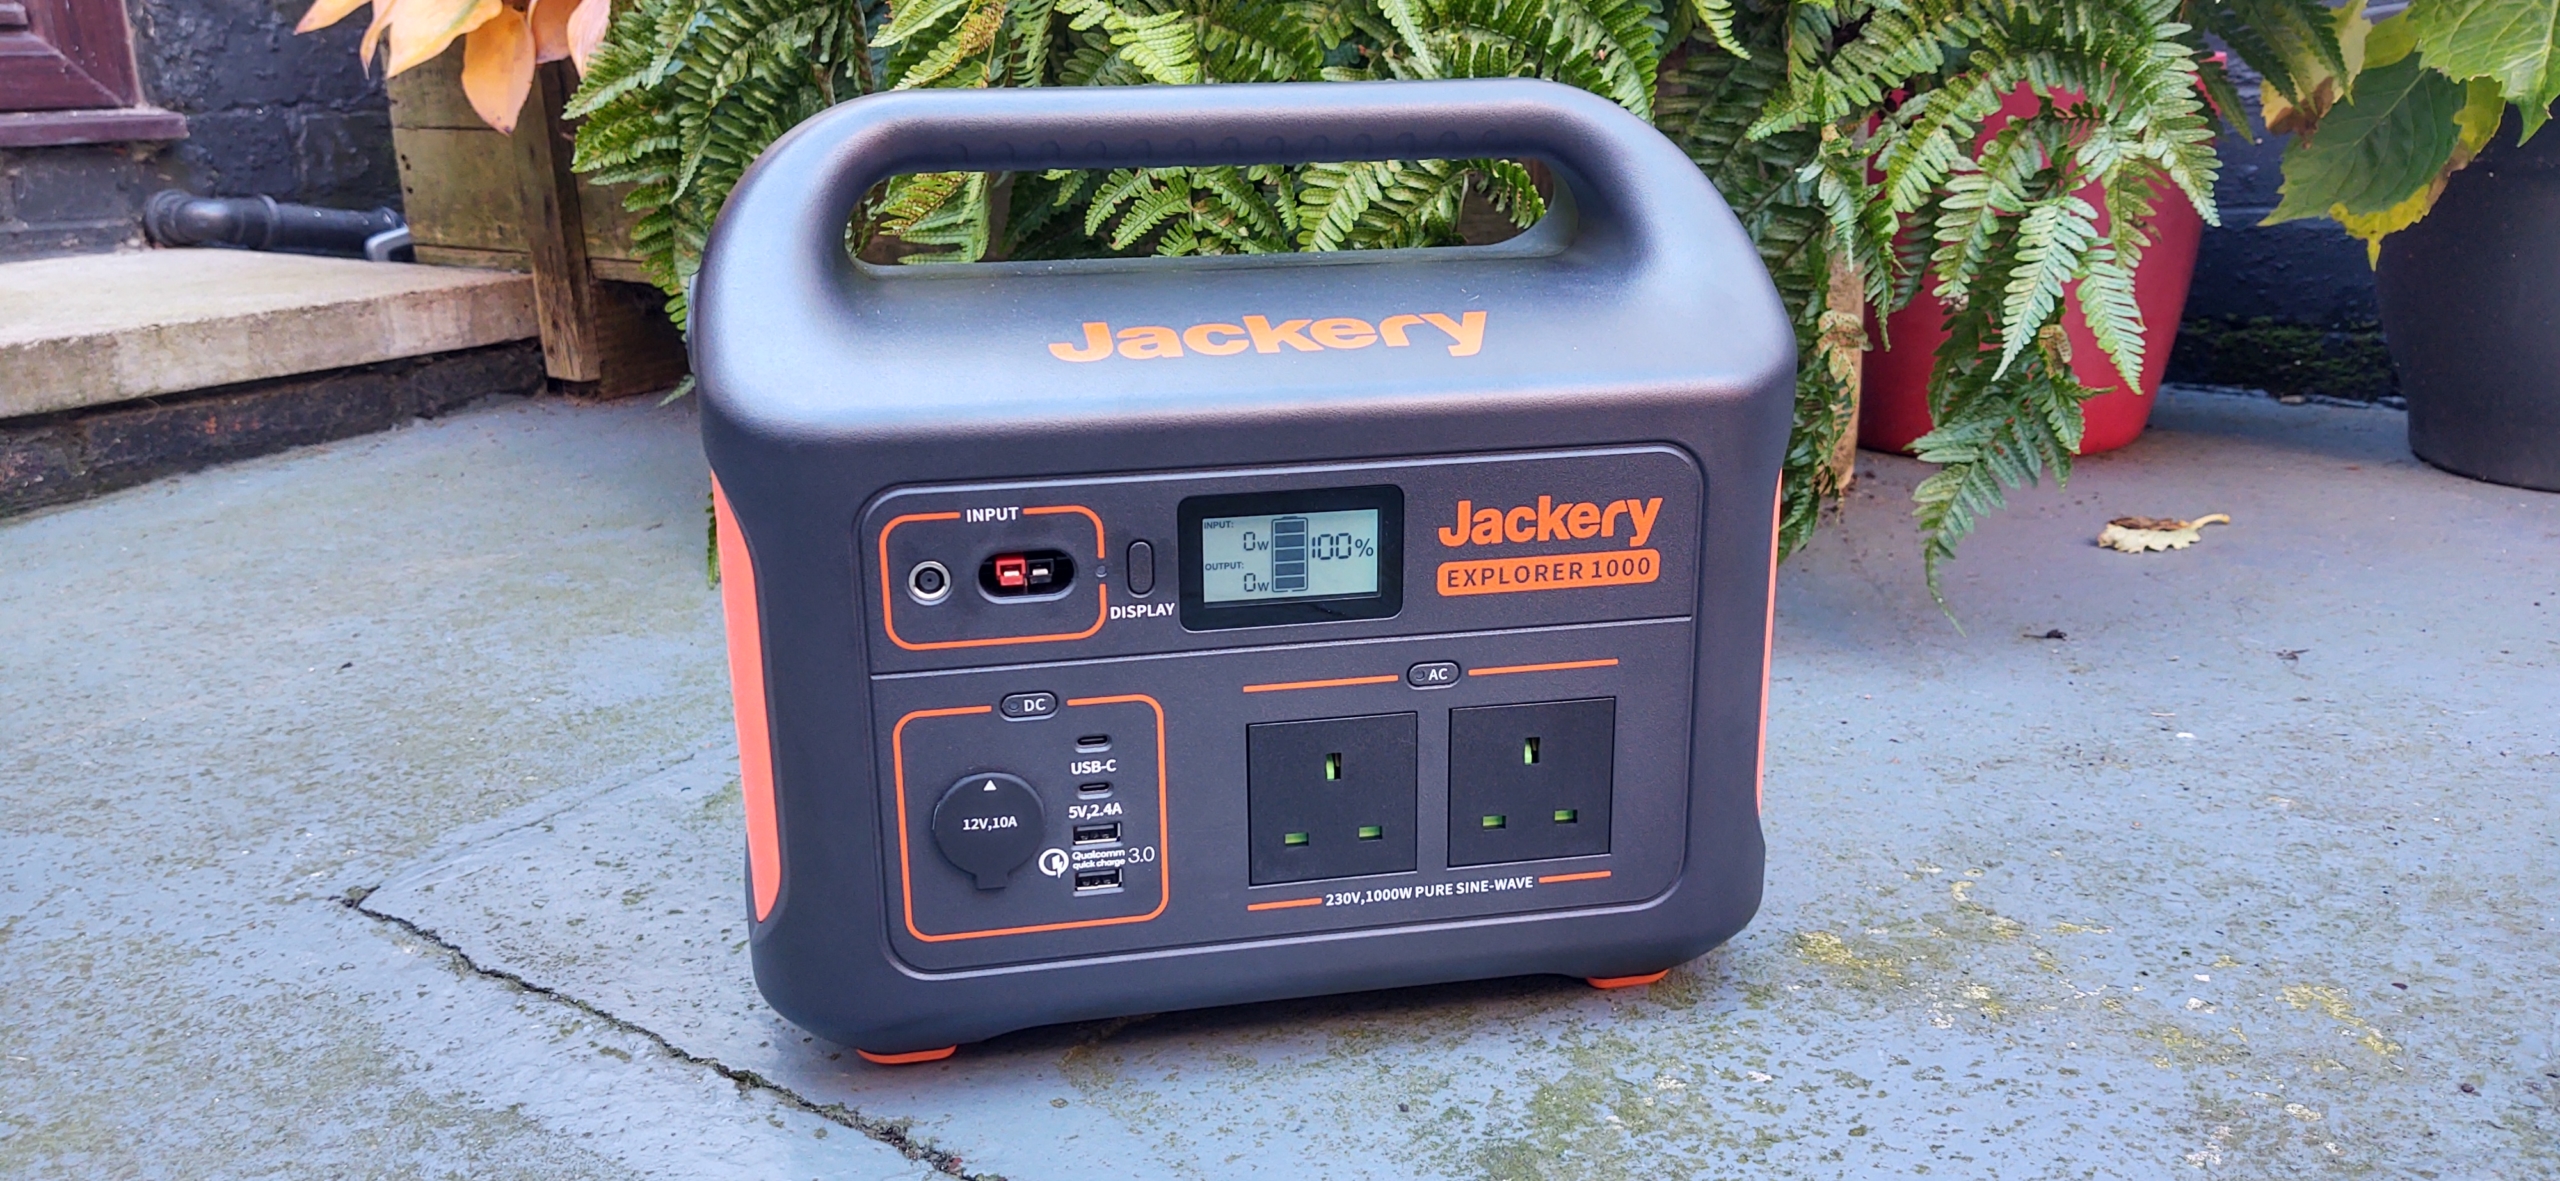
It’s a very well-made plastic box, which looks good, feels durable and is clearly high quality. It holds a big Lithium Ion battery, 1002Wh, which is the equivalent of about 80Ah at 12V. But it’s better than the numbers look. Most motorhomes have lead-acid leisure batteries, which can only be discharged to 50% without risking damage, so half their capacity is unusable. But you can use 85% of the Jackery’s battery, so it’s really the equivalent of around 136Ah of lead-acid batteries. That’s pretty serious amount of juice, and will roughly double our van’s 12V capacity while only weighing in at 10Kg.
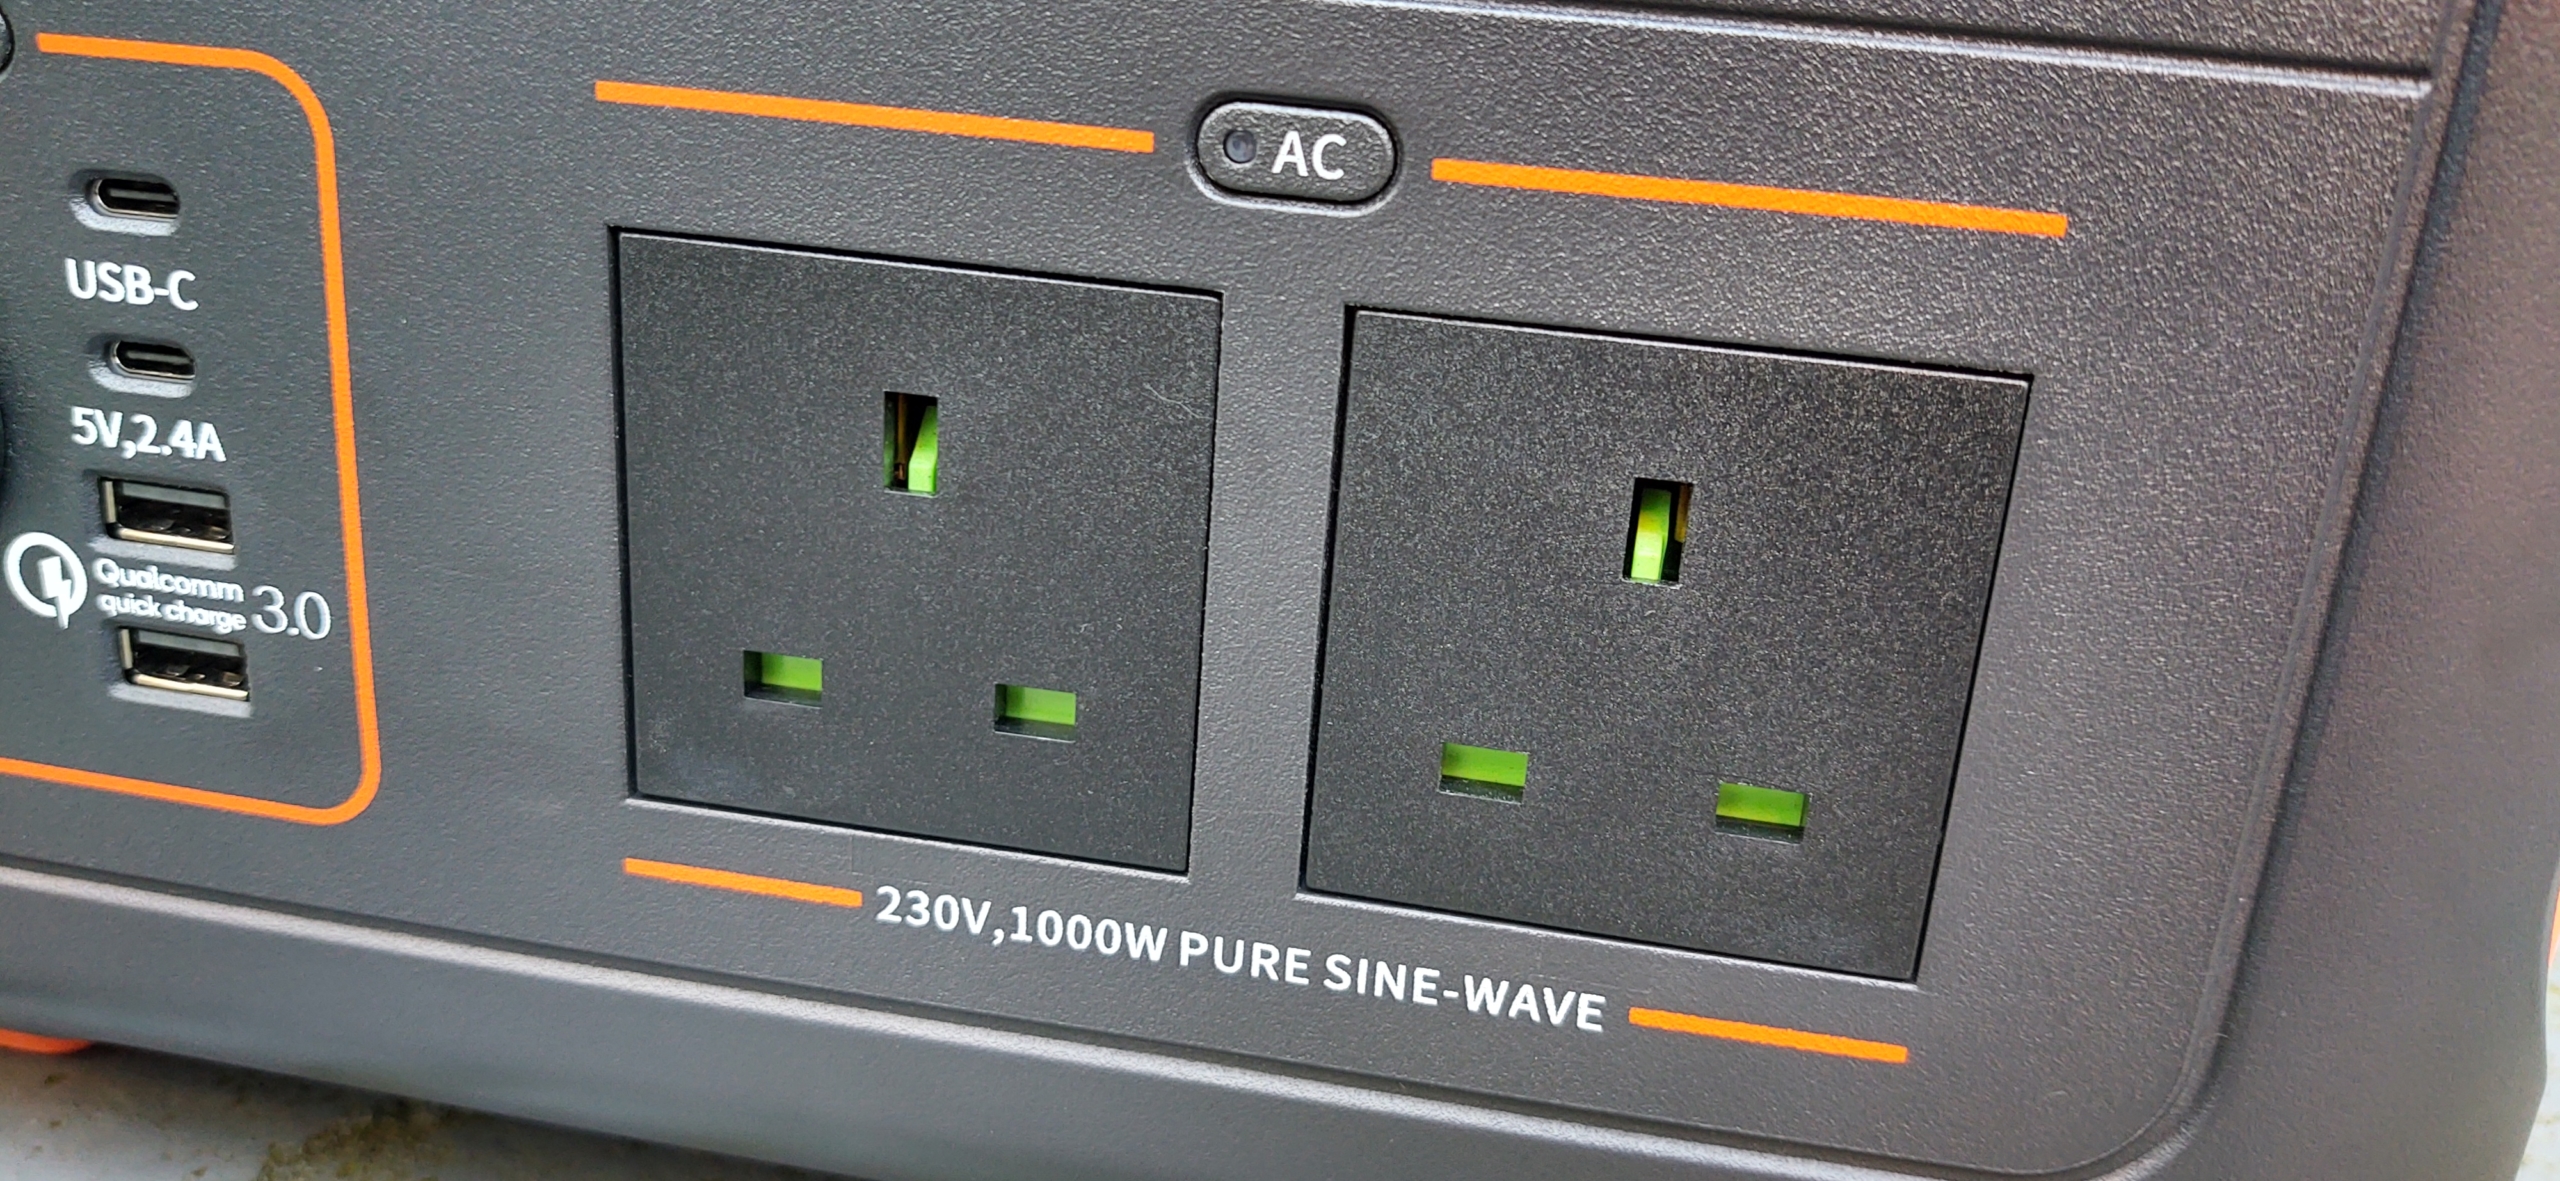
Along with USB ports for charging smart phones, tablets, laptops, Kindles etc, the Jackery has a 1kW inverter connected to a couple of three pin sockets on the front. This is a ‘pure sine’ type, so can be safely used with more sensive electrical kit like laptop chargers. It’ll handle a temporary ‘surge’ load of 2kW, which is useful for equipment which needs a higher amount of power to start up, but then runs at a lower power demand.
Eyeballing all those YouTube reviews, we’ve seen the Explorer 1000 used to power coffee makers, blenders, two-slice toasters, travel kettles, low-power hairdryers, projectors, electrical blankets, TVs, 12V and mains voltage fridges, slow cookers, microwaves, grills, a circular saw, and plenty more. The more powerful the stuff you connect, the faster it’ll be depleted though. For example, you could run an 800W microwave from a fully charged Explorer 1000 for about 50 minutes before the battery’s down to 15%.

Jackery sell several versions of the Explorer in the UK. They have even more powerful versions than the 1000, but they’re only available in the US, have US-style plug sockets and are 110V, so no good with European 230V mains equipment. Here are the three sizes:
- The Jackery Explorer 240 – about £250 – with a 240Wh battery and a 200W inverter.
- The Jackery Explorer 500 – about £500 – with a 518Wh battery and a 500W inverter.
- The Jackery Explorer 1000 – about £1,000 – with a 1002Wh battery and a 1kW inverter.
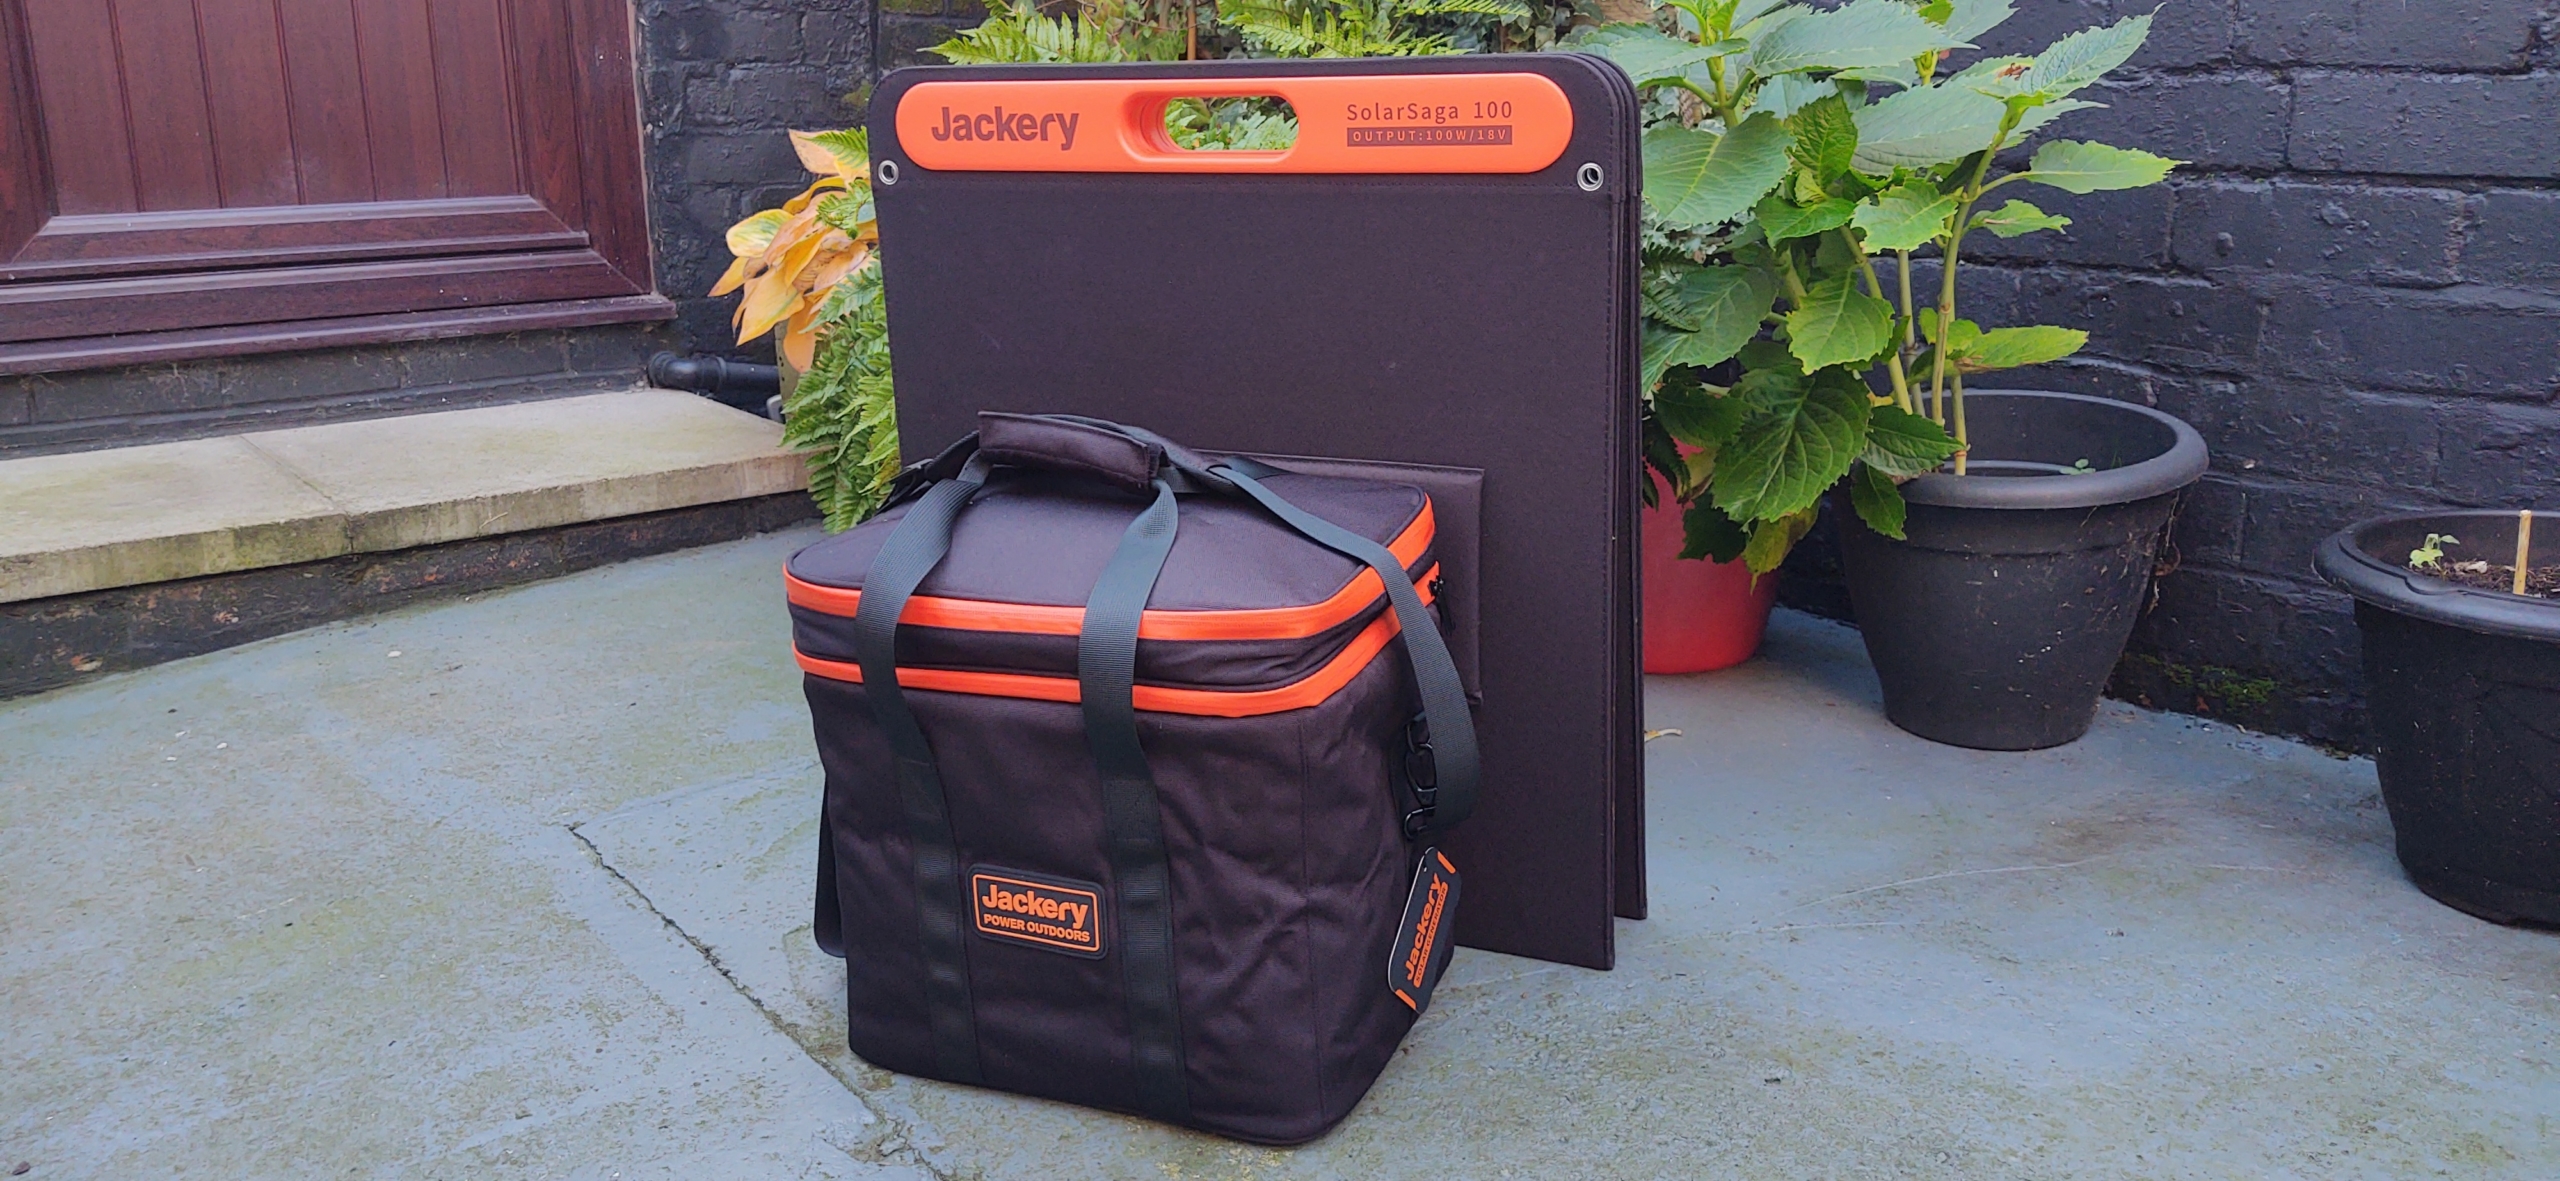
If you’re interested, keep an eye out for deals, particularly around Black Friday and over the Xmas period. Jackery also sent us a carry bag for the Explorer, pictured above. It again feels good quality but isn’t cheap at about £50 (latest price here on Amazon). Its main use seems to be keeping the cables and Explorer together. It has a shoulder strap too, which makes it easier to lug the 10kg around, and it will protect the Explorer from being bashed while stored under a seat.
And What are the SolarSaga Panels?
Jackery say there are four ways to recharge the Explorer:
- From the mains.
- From a cigarette lighter socket.
- Using a petrol or diesel generator (we’ll ignore this one, it seems daft).
- And finally using their own SolarSaga panels.
Our guess is most motorhome/campervan folks will mainly use the first two options and we’ll come back to them below.
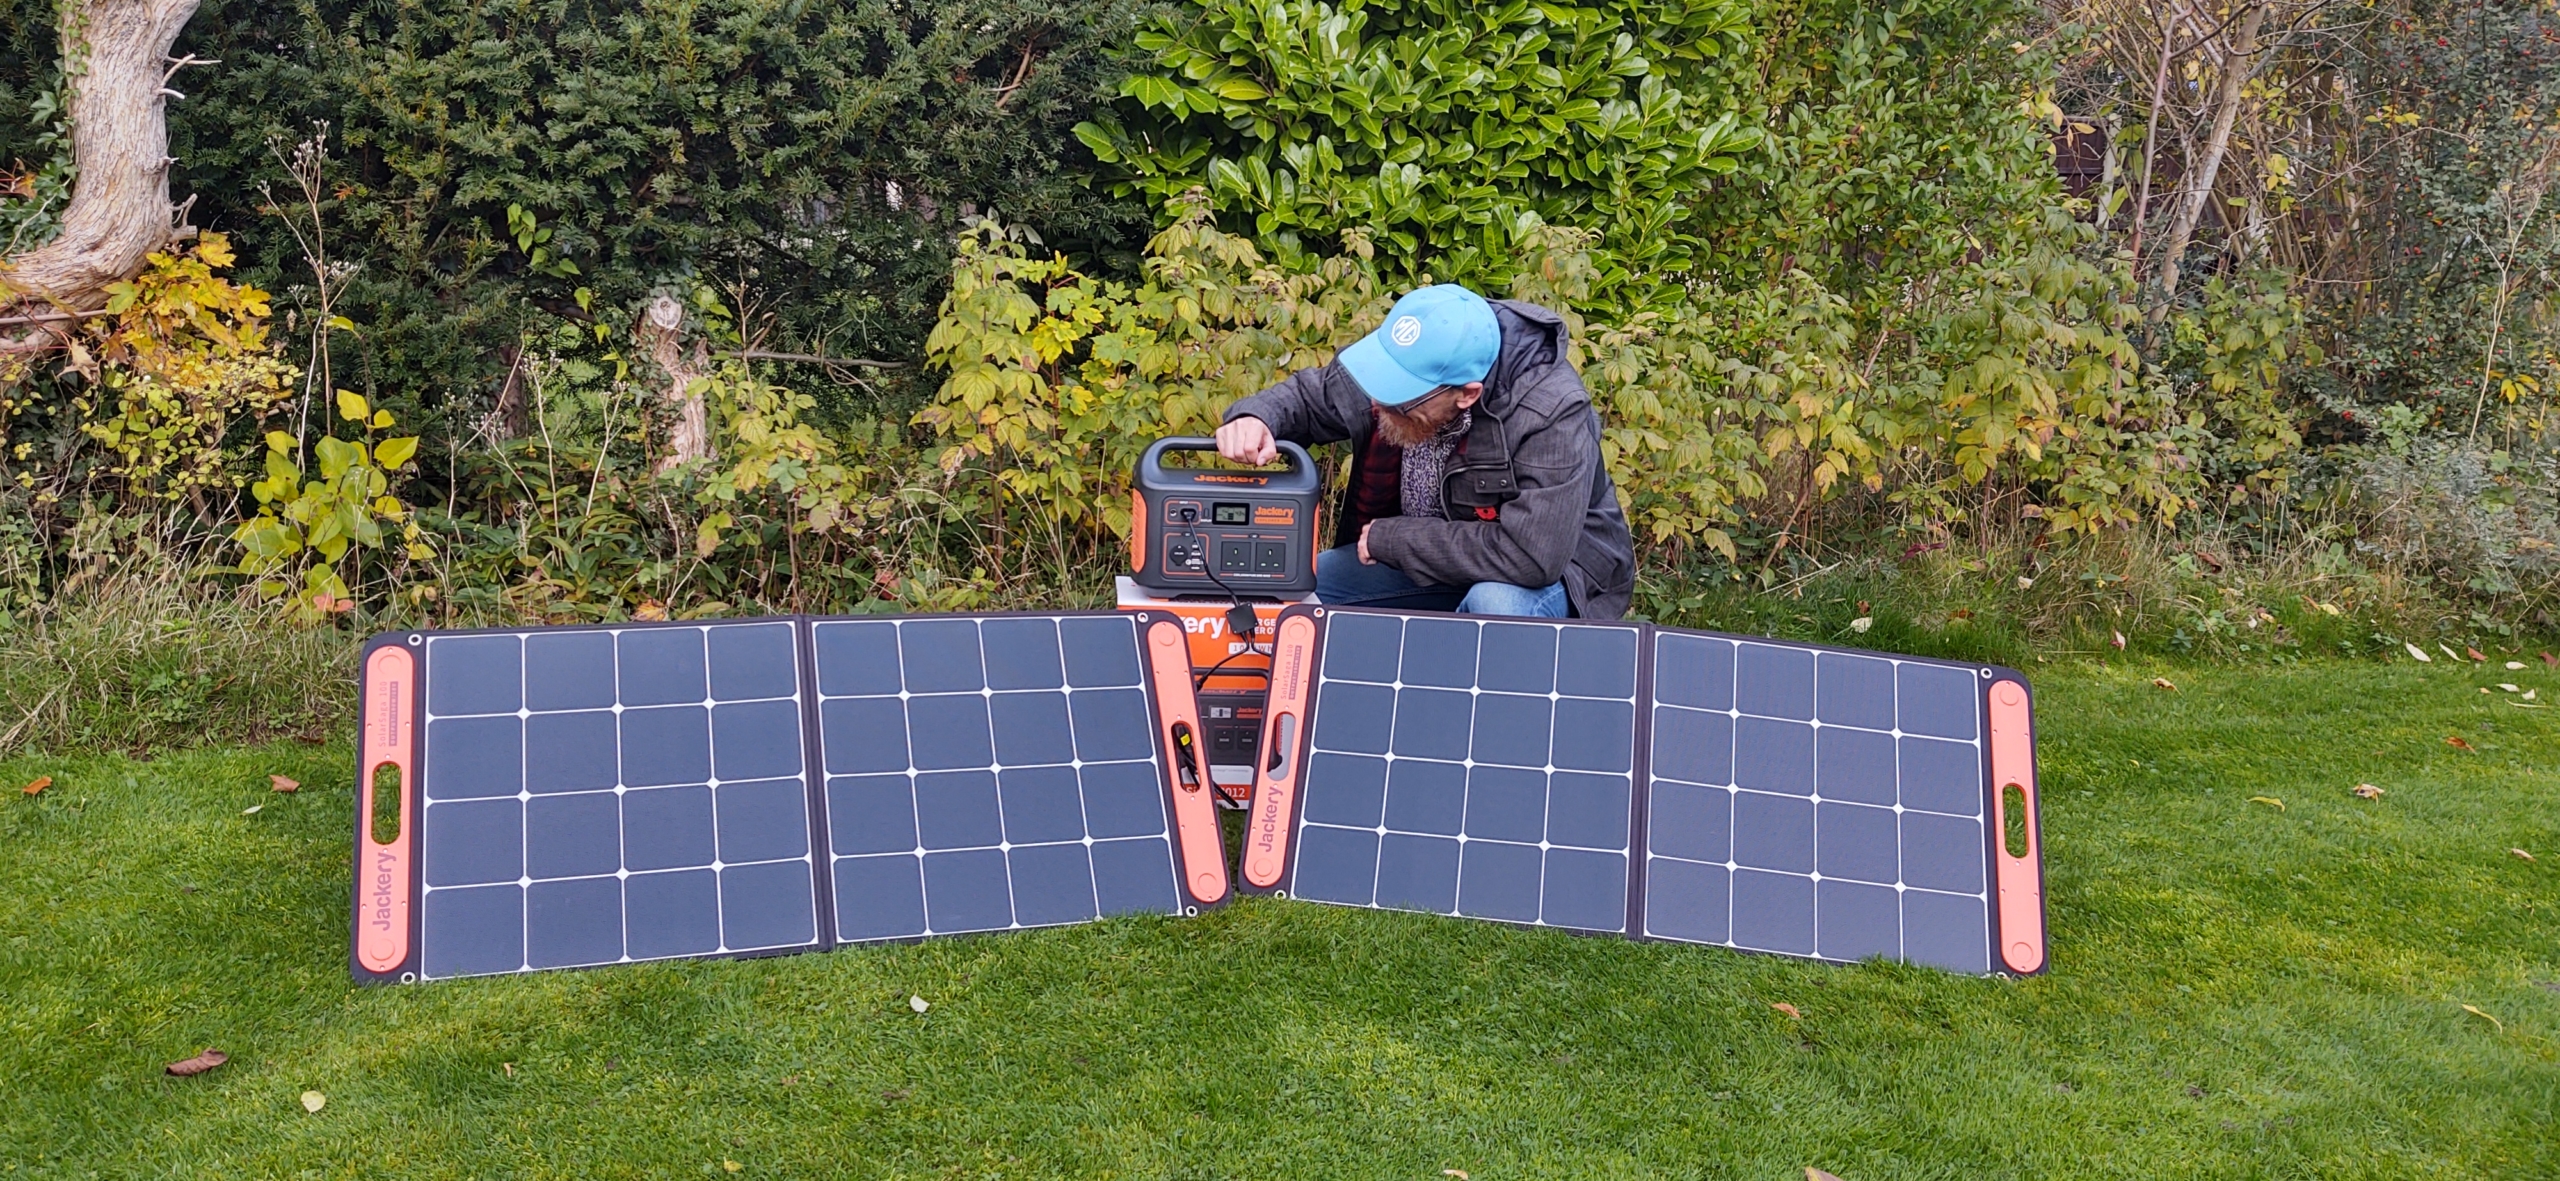
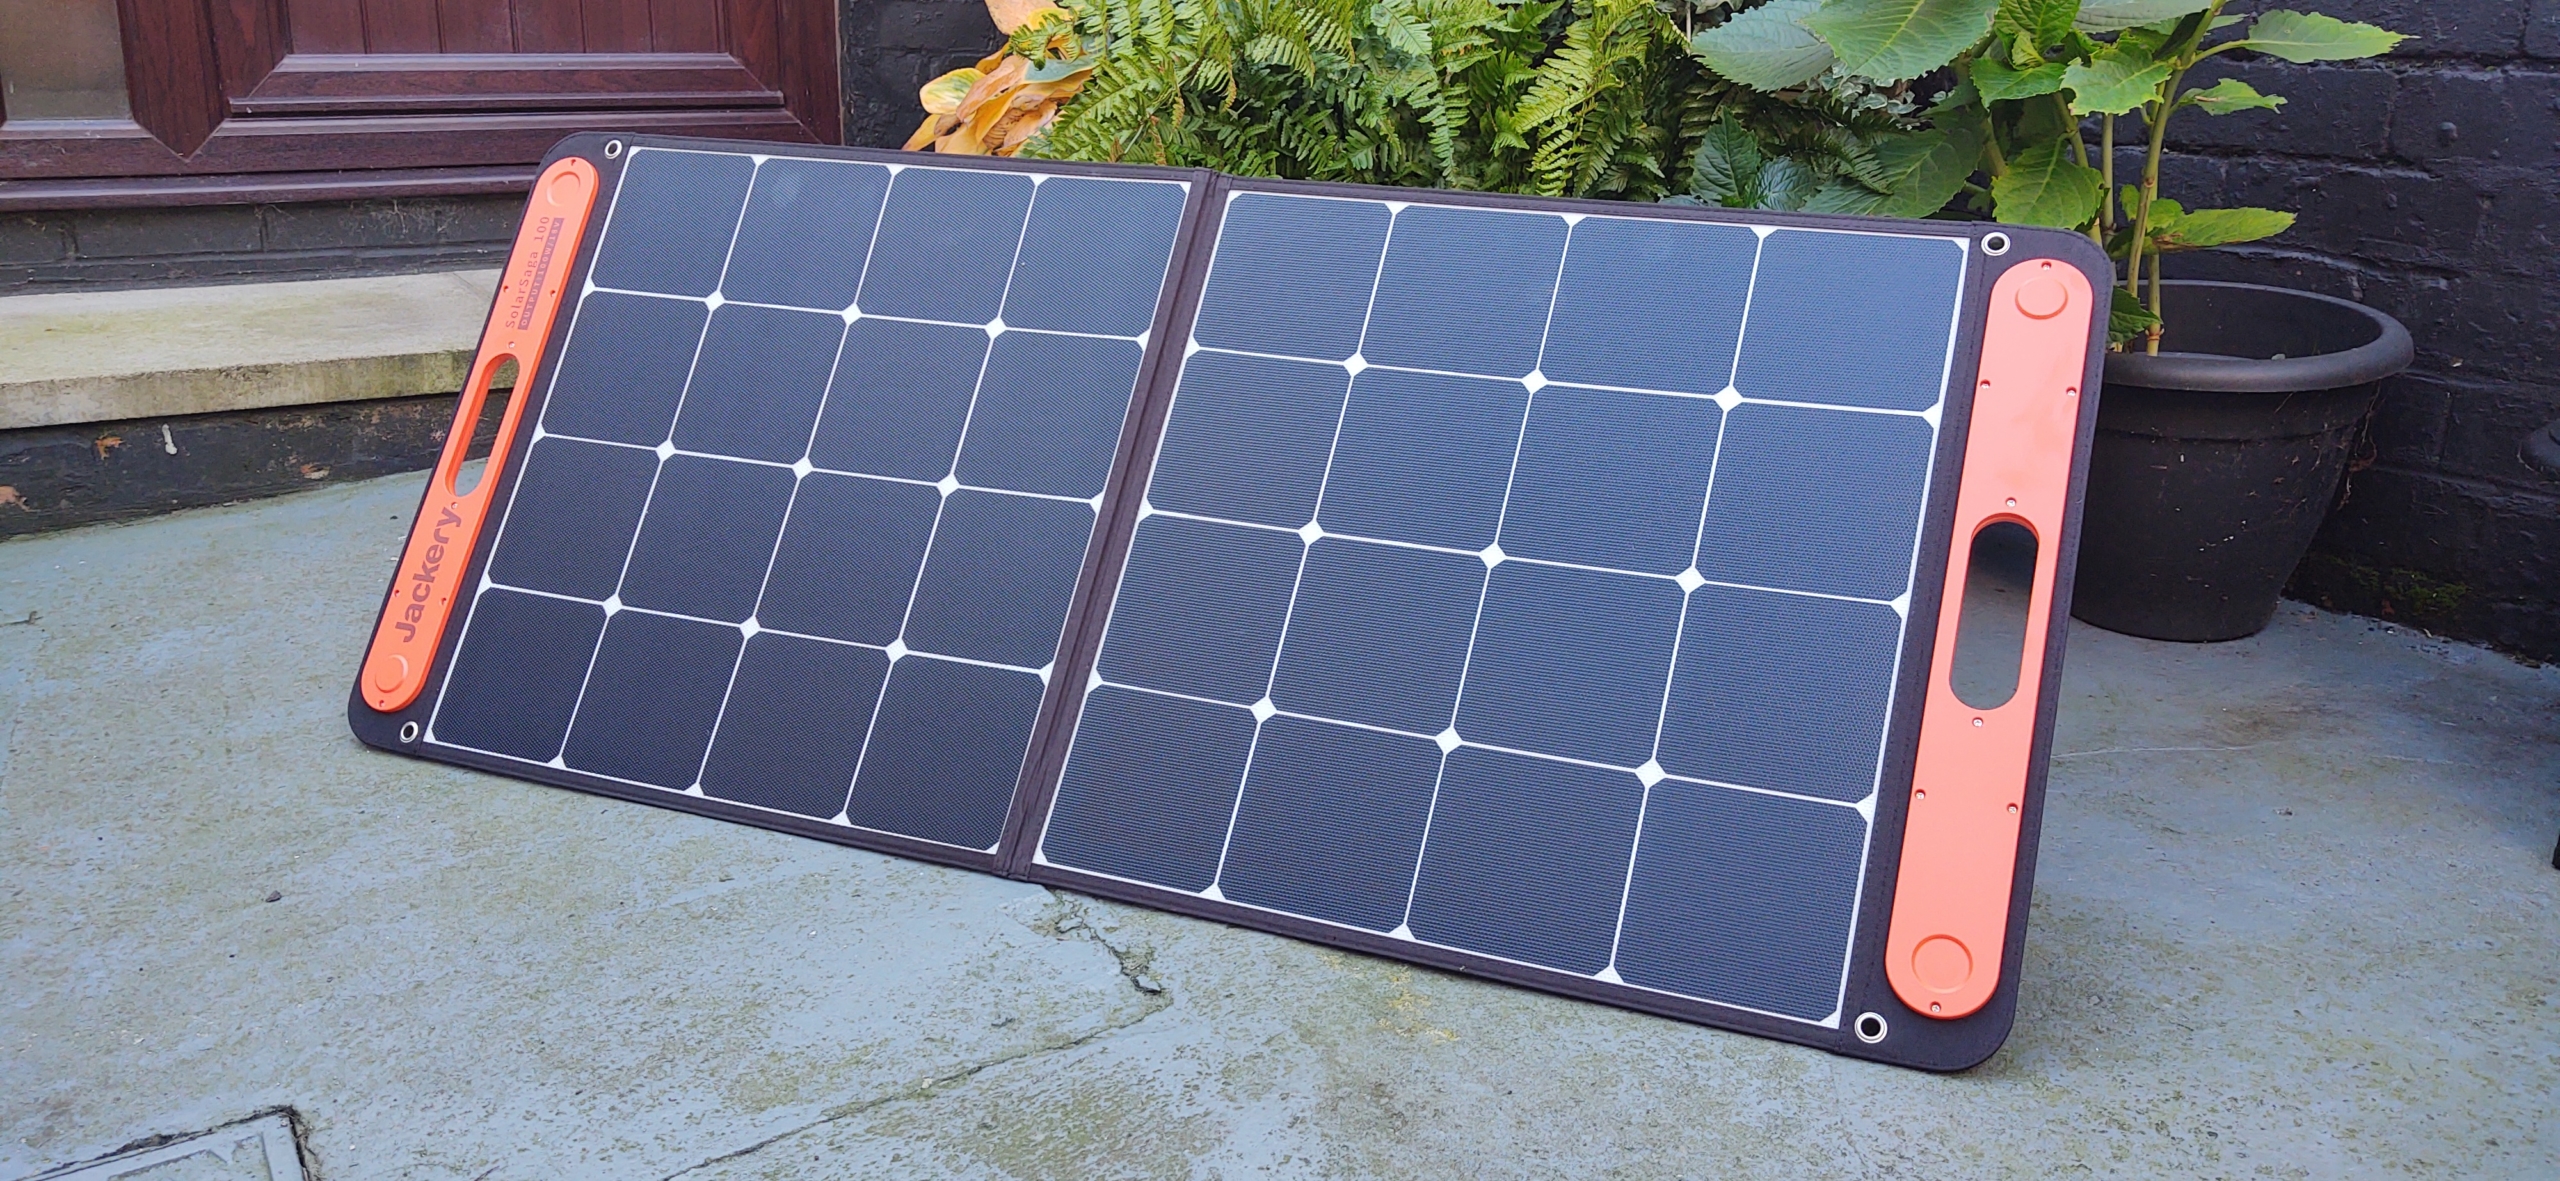
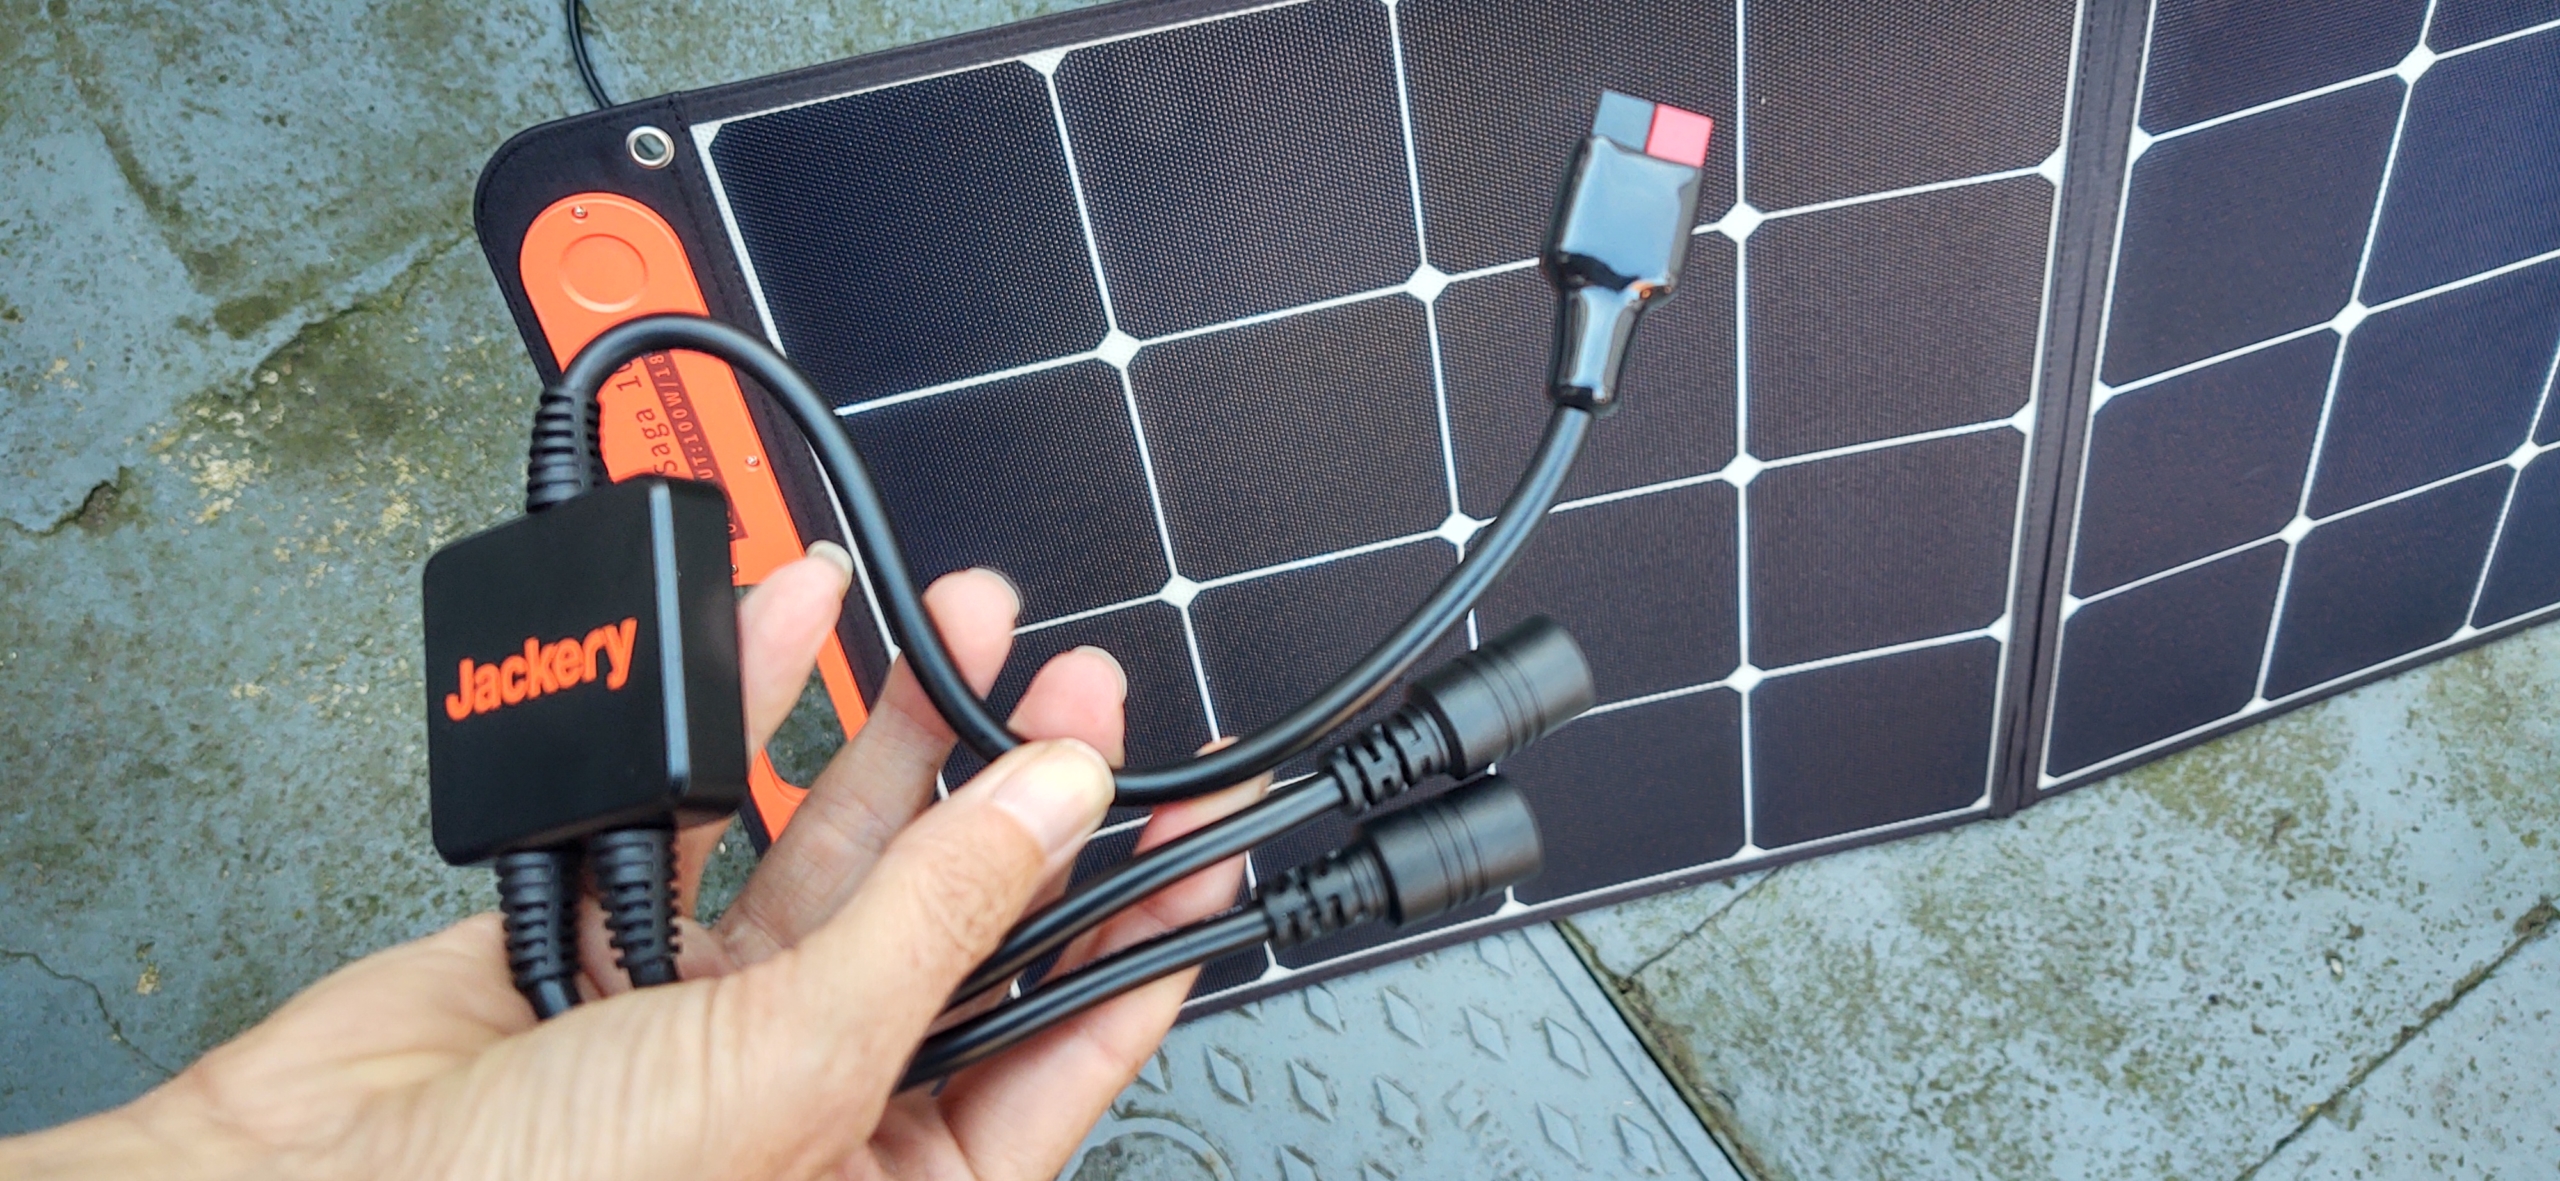
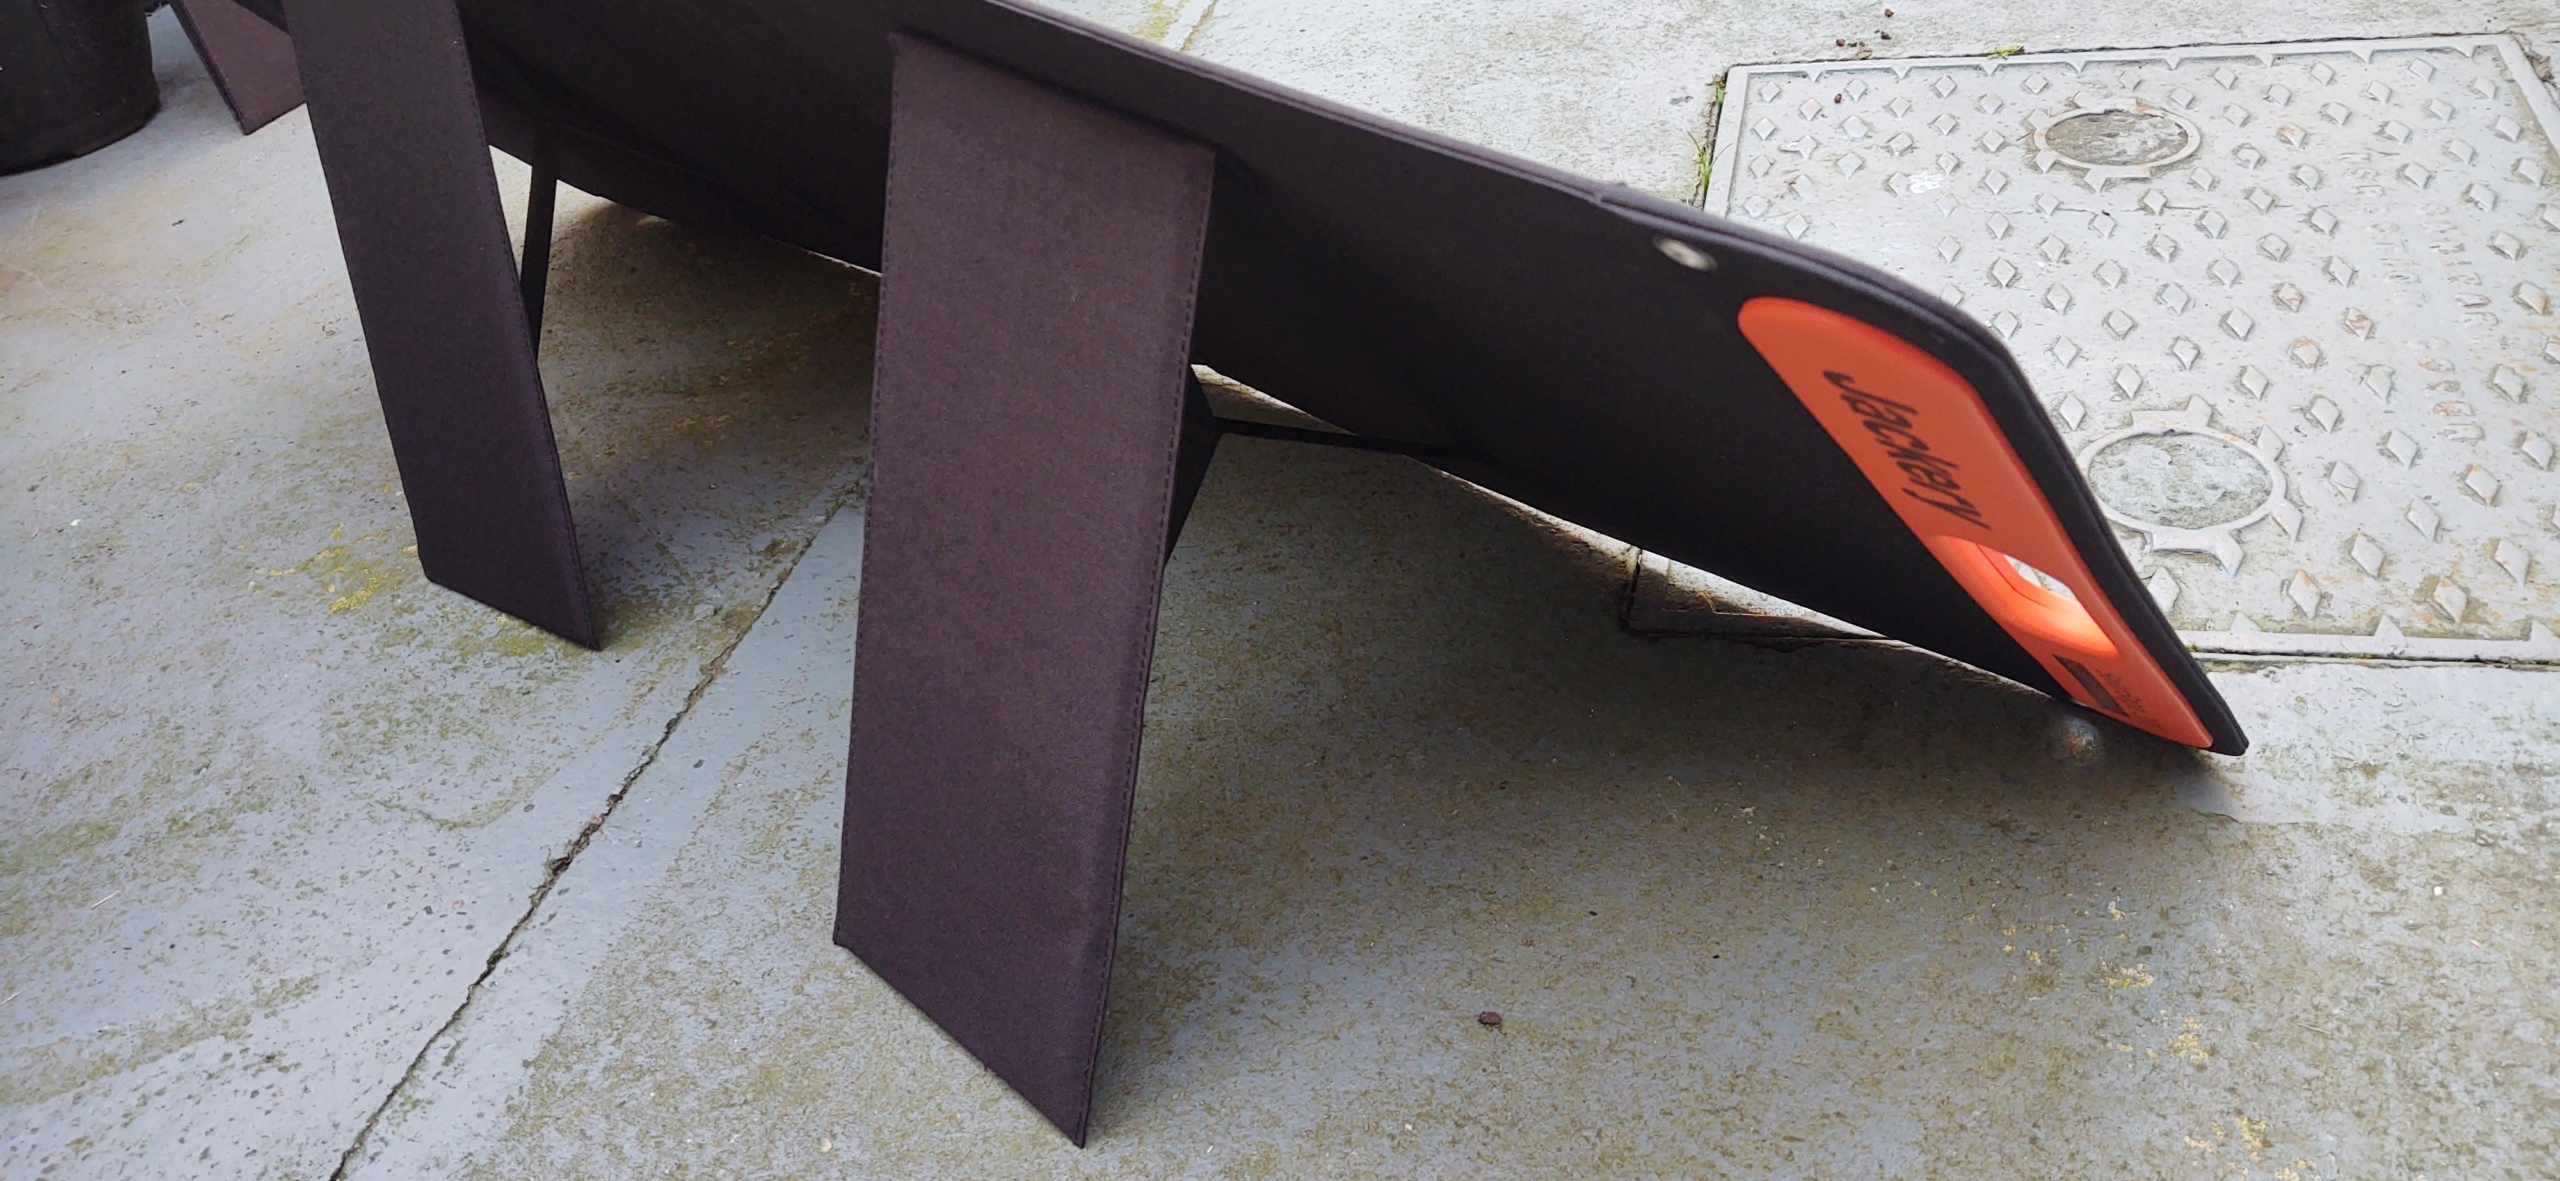
The SolarSaga panels are still intriguing though. They’re large folding solar panels with a carry handle. The idea is you pop them beside your van, facing the sun, propped-up with a built-in support. You can then either plug any kit which charges via USB directly into them if you don’t own an Explorer or have one but don’t want to get it out. Or you can plug up to two of the panels into the Explorer.
The panels are each capable of producing up to 100W (about 5.5 Amps), although that’ll only be in stong direct overhead sunlight, plus the Explorer only accepts a maximum of about 140W input (about 8 Amps), so can’t charge at the full 200W. When full-timing, our power needs were at their highest in winter, running the heating fan, lights and watching more TV during dark nights. But winter’s the worst time for generating solar. The solar panels on our house in Nottingham generate about 6 times more power in May than in December or January.
The panels can’t be plugged directly into your van’s 12V system without making some modifications, as there’s nowhere for the plugs to go. Also, the panels are splash-proof, but not rainproof, so you’ll need to keep them under your awning or get them inside if it lashes it down.
The SolarSaga panels are sold through Amazon for about £250 apiece and weigh about 5Kg each.
The Explorer and SolarSaga Panels in a UK Motorhome or Camper
OK, so just how might we/you use this kit in a van? Well, if we always head to a pitch which has electrical hook-up, and our van’s 12V system is reliable, we needn’t bother with it. We can all save our money. Although that said, it might still prove handy. For example, it’ll charge cameras, drones, eBikes and the like. If you’re into other outdoor stuff you might still want to consider carrying it in your car boot for recharging kit while you’re out and about.
Our guess is the Explorer is going to be more attractive to motorhomers than the SolarSaga panels, but it’s just a guess. Why do we say that? Well, we’ve used solar panels on our motorhomes for over ten years, and they’ve proved massively useful to us. So it’s not that we don’t love solar. But the panels we have are (a) waterproof and (b) glued to the roof. They just sit there slowly popping a few amps into our batteries during daylight hours. They’re out of reach of any light-fingered passers-by and don’t need to be whipped in when it rains. They don’t fall over when it gets windy either (although the SolarSaga panels do have eyelets so can be tied down).
One time portable panels might have proved useful was in the heat. We’d sometimes choose to park in the shade to keep cooler, losing solar input as a result. With portable panels we could have had the best of both worlds. That situation was pretty rare though. We’d often find we could only get a shaded parking spot on a campsite, which tended to have hook-up available. On CampingCard ACIS sites, hook-up was included in the overnight cost, but on other sites we might have saved a few quid if we could have used the Jackery panels instead.
The problem we see with these portable panels is the relatively few places we might be able to use them. Even at 140W, about the most the Explorer can accept, it would take 1002Wh/140W = 7 hours to fully recharge the unit. In practice we might only use say 30% of the capacity, so the Explorer would be fully brimmed in just over 2 hours, which feels far more practical. But still, to get that power you’ve got to be somewhere with the panels sat outside while you’re nearby making sure they’re not nicked. If you’ve enough space, you could pop one of the panels behind your windscreen when you go out and lock the van, and we’ve seen folks do that with flexible panels wild camping across Europe.
Our guess is we’d most likely charge the Explorer from the mains while at home or at a campsite or aire which provides hook-up. We’d then use it to help out our van’s built-in leisure batteries and solar panel. We could charge some of our kit directly from it or run stuff like our 400W Remoska oven-replacement from it, baking spuds in the middle of nowhere.
Or if we needed it to help run our van’s heater fan or water pump, for example, we’d use our hook-up cable with a 3 pin adapter to connect the Explorer to the van’s external hook-up socket. That would transfer power from the Explorer to our van’s leisure batteries. The obvious downsides to this are (a) we’d lose 15% of the power to inverter inefficiencies and (b) we’d have to leave the Explorer outside, or run the cable through a window or door, not ideal if its raining or freezing cold, or we both wanted to go out and lock the van up.
The second most useful charging option for us would be the 12V cigarette lighter/aux socket. We’d only use this while driving, so the alternator could keep our starter battery topped up, or we’d risk flattening it and not being able to move the van. The Explorer 1000 has no ‘jump start’ capability like this RAC power pack (we used to have a similar power pack to this and found it very handy with our old Harmony Autosleeper). The Explorer comes with a cigarette lighter socket cable, and it would take 11 to 14 hours to fully charge this way (a 3 hour drive should fully top up the battery if it started at 80% charged). Effectively we’d be using a diesel generator to charge it up as we drove, so not the cleanest way to run the Explorer.
Hands-On with the Explorer and SolarSaga Panels
Let’s have a closer shuftee at the kit.
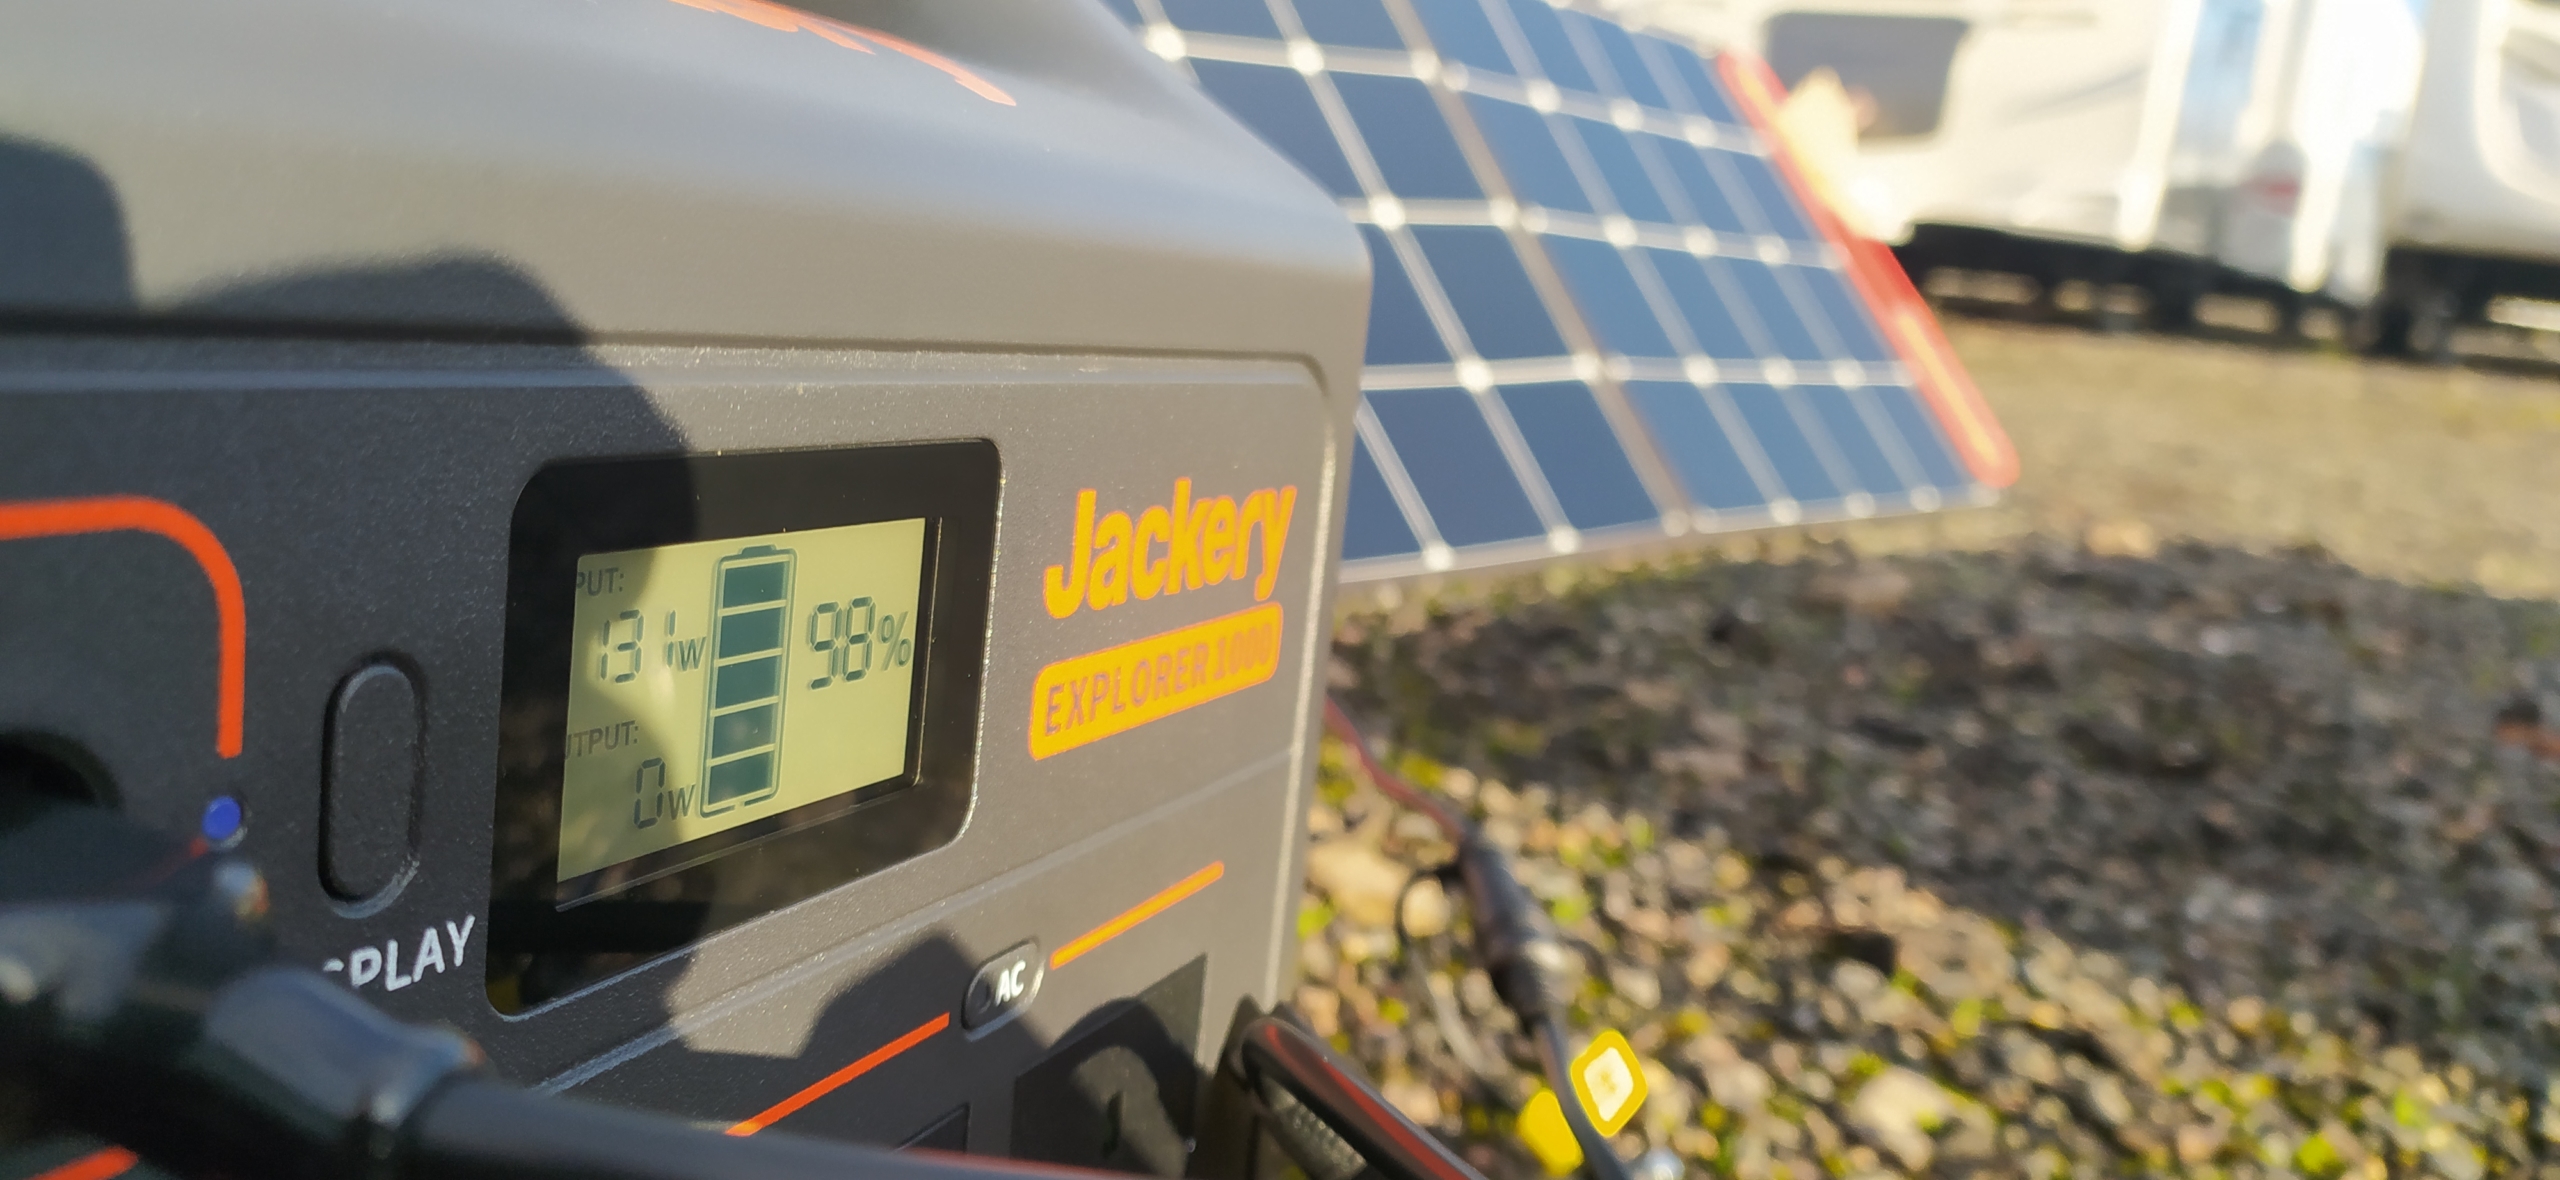
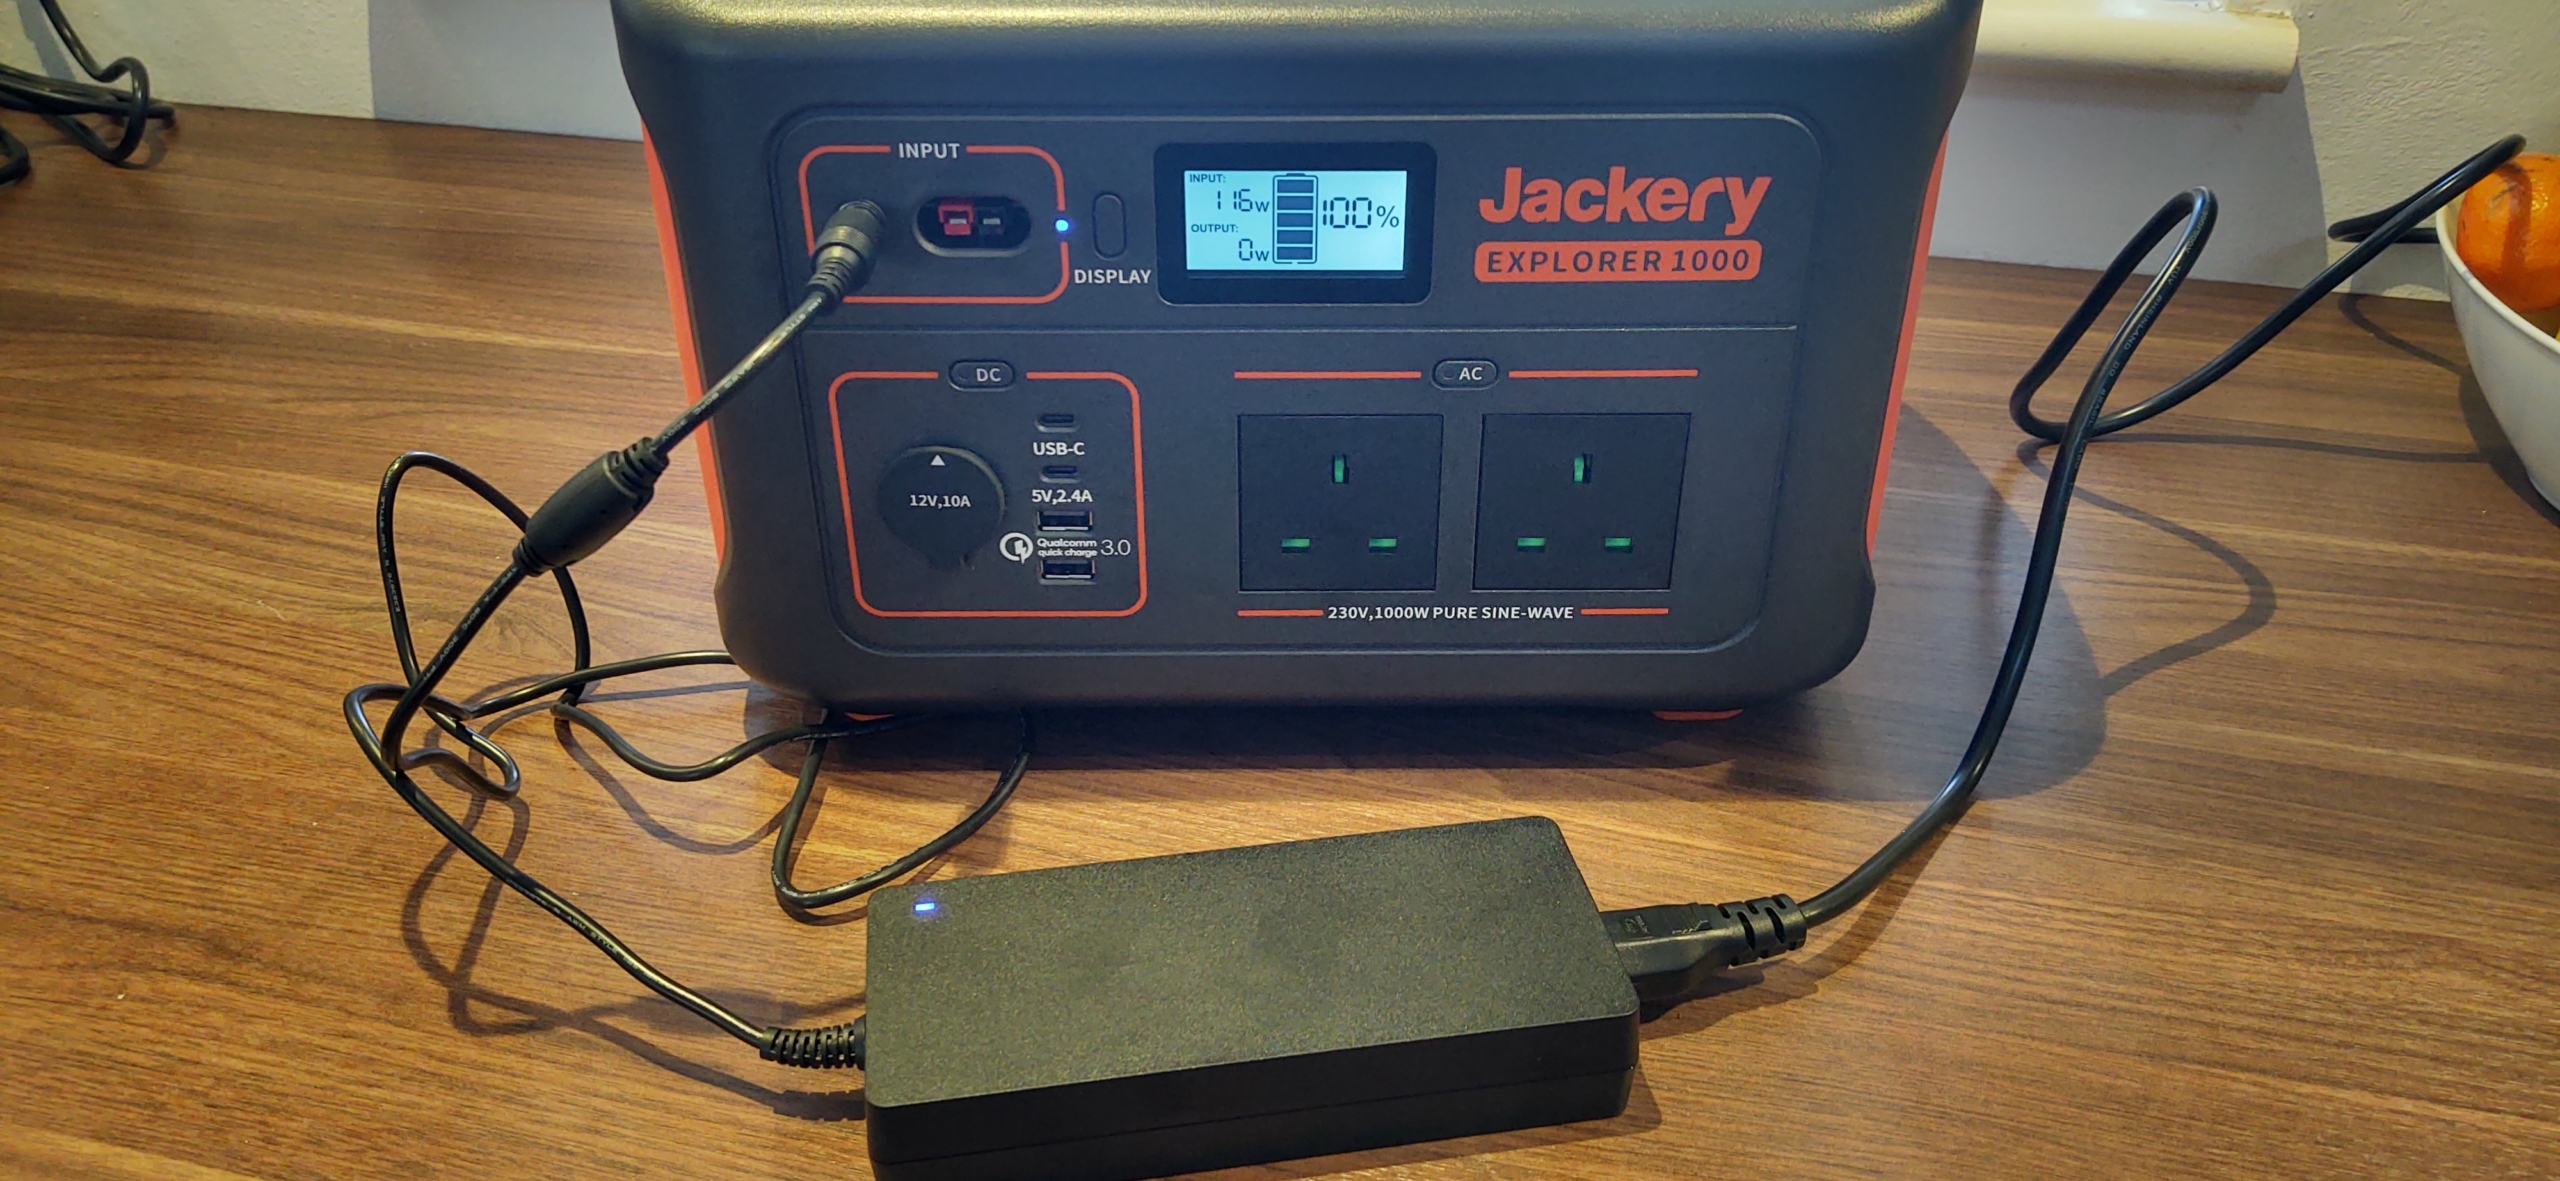
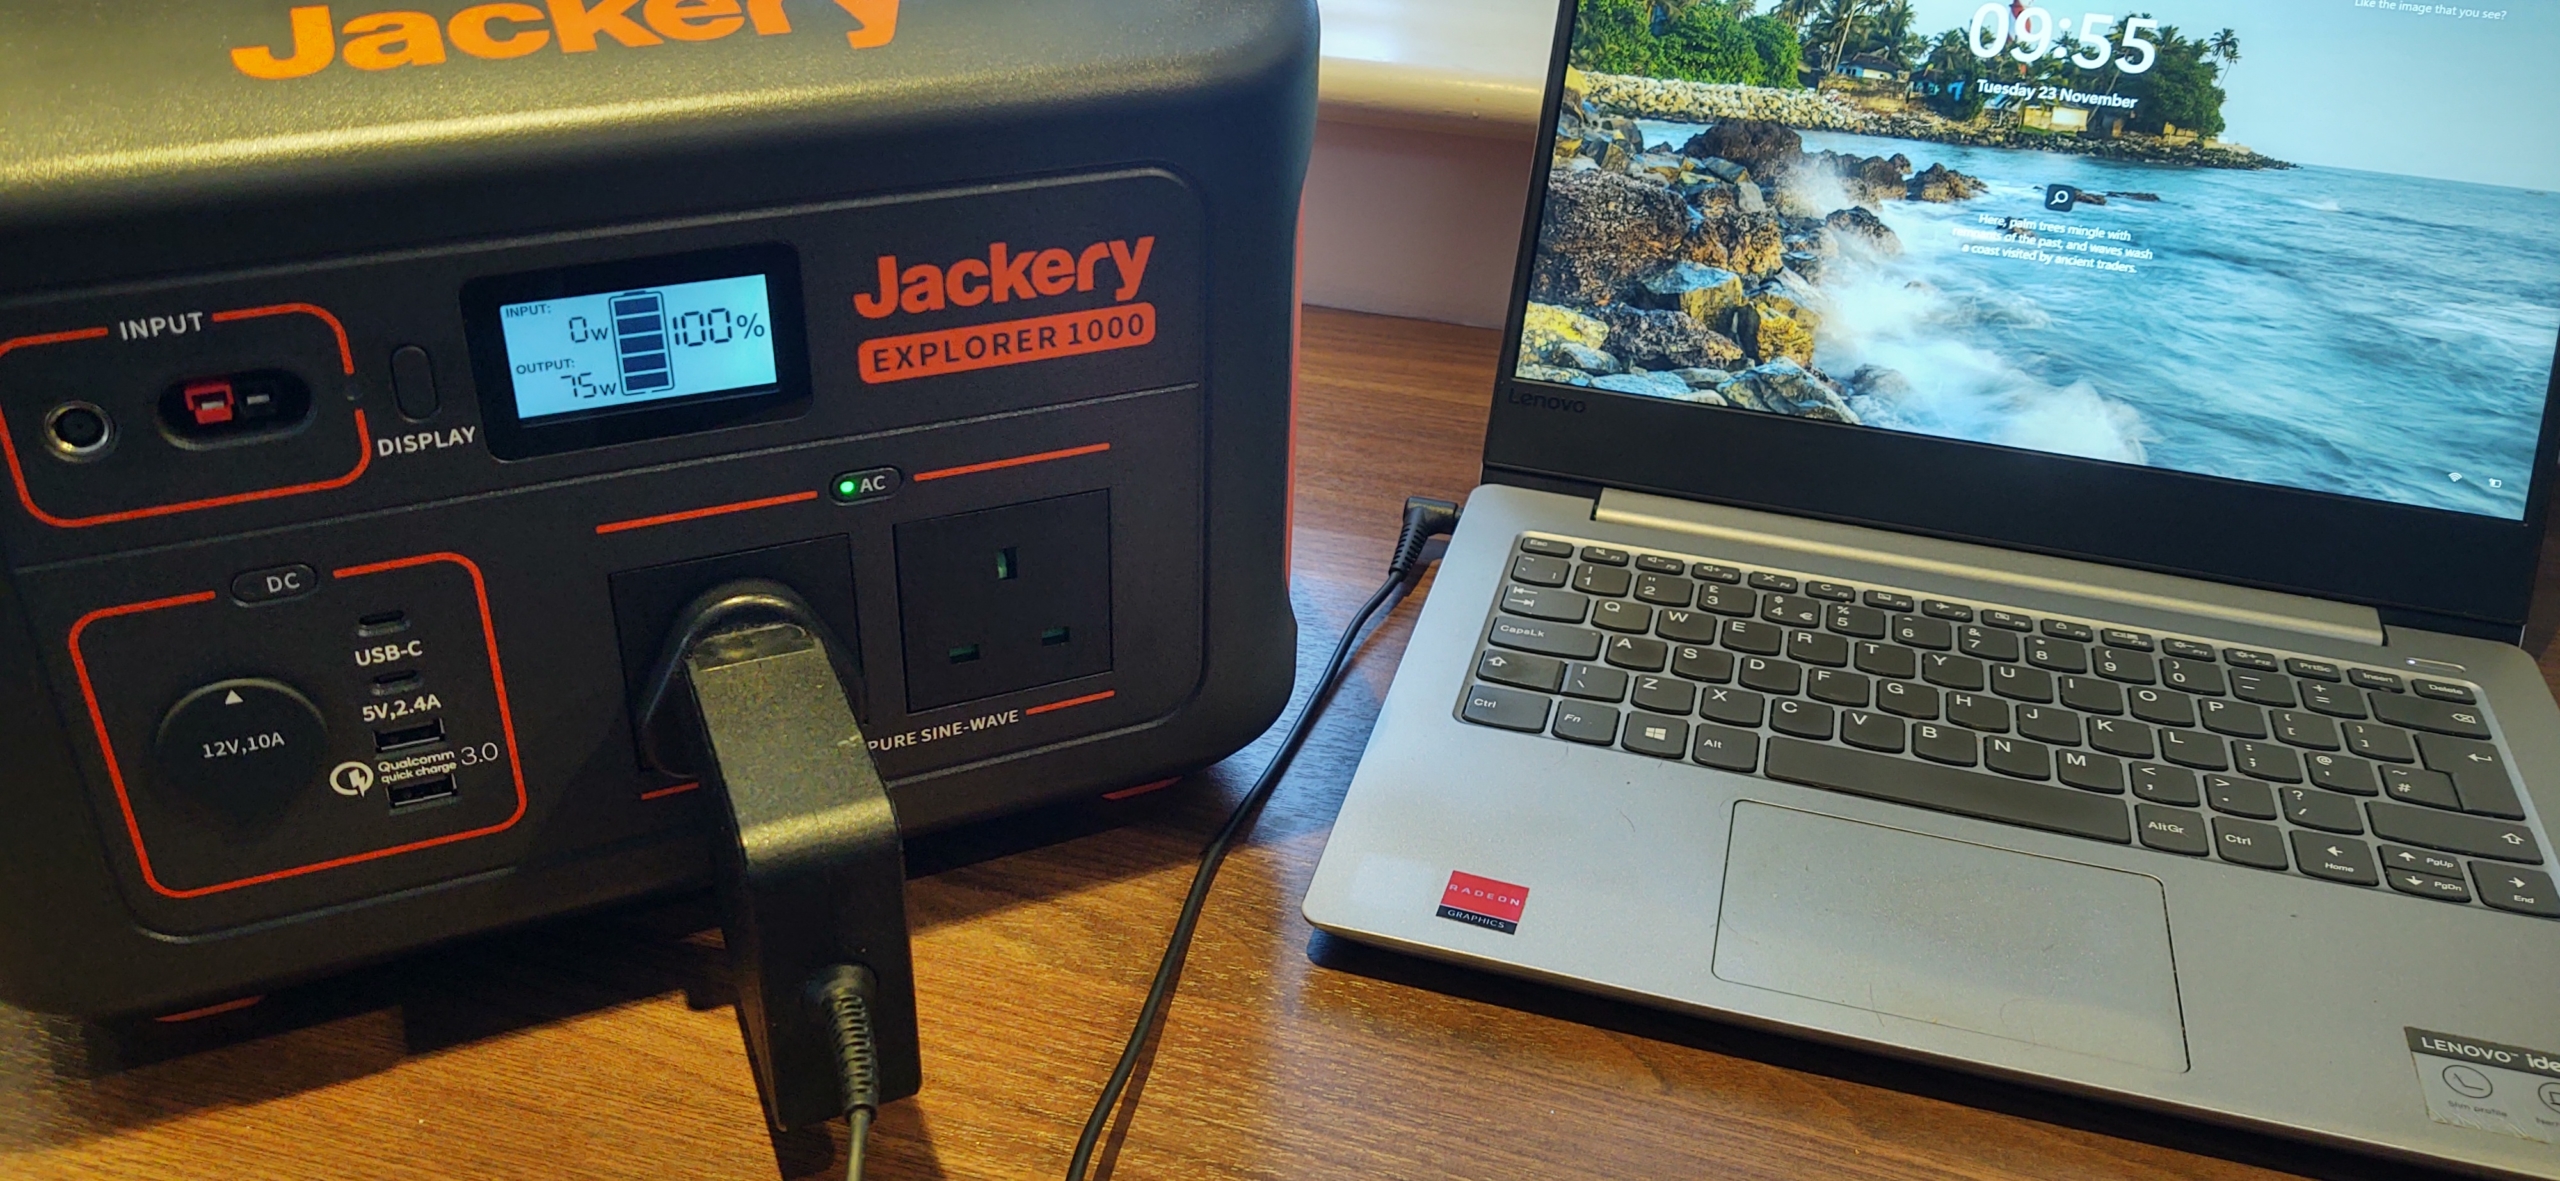
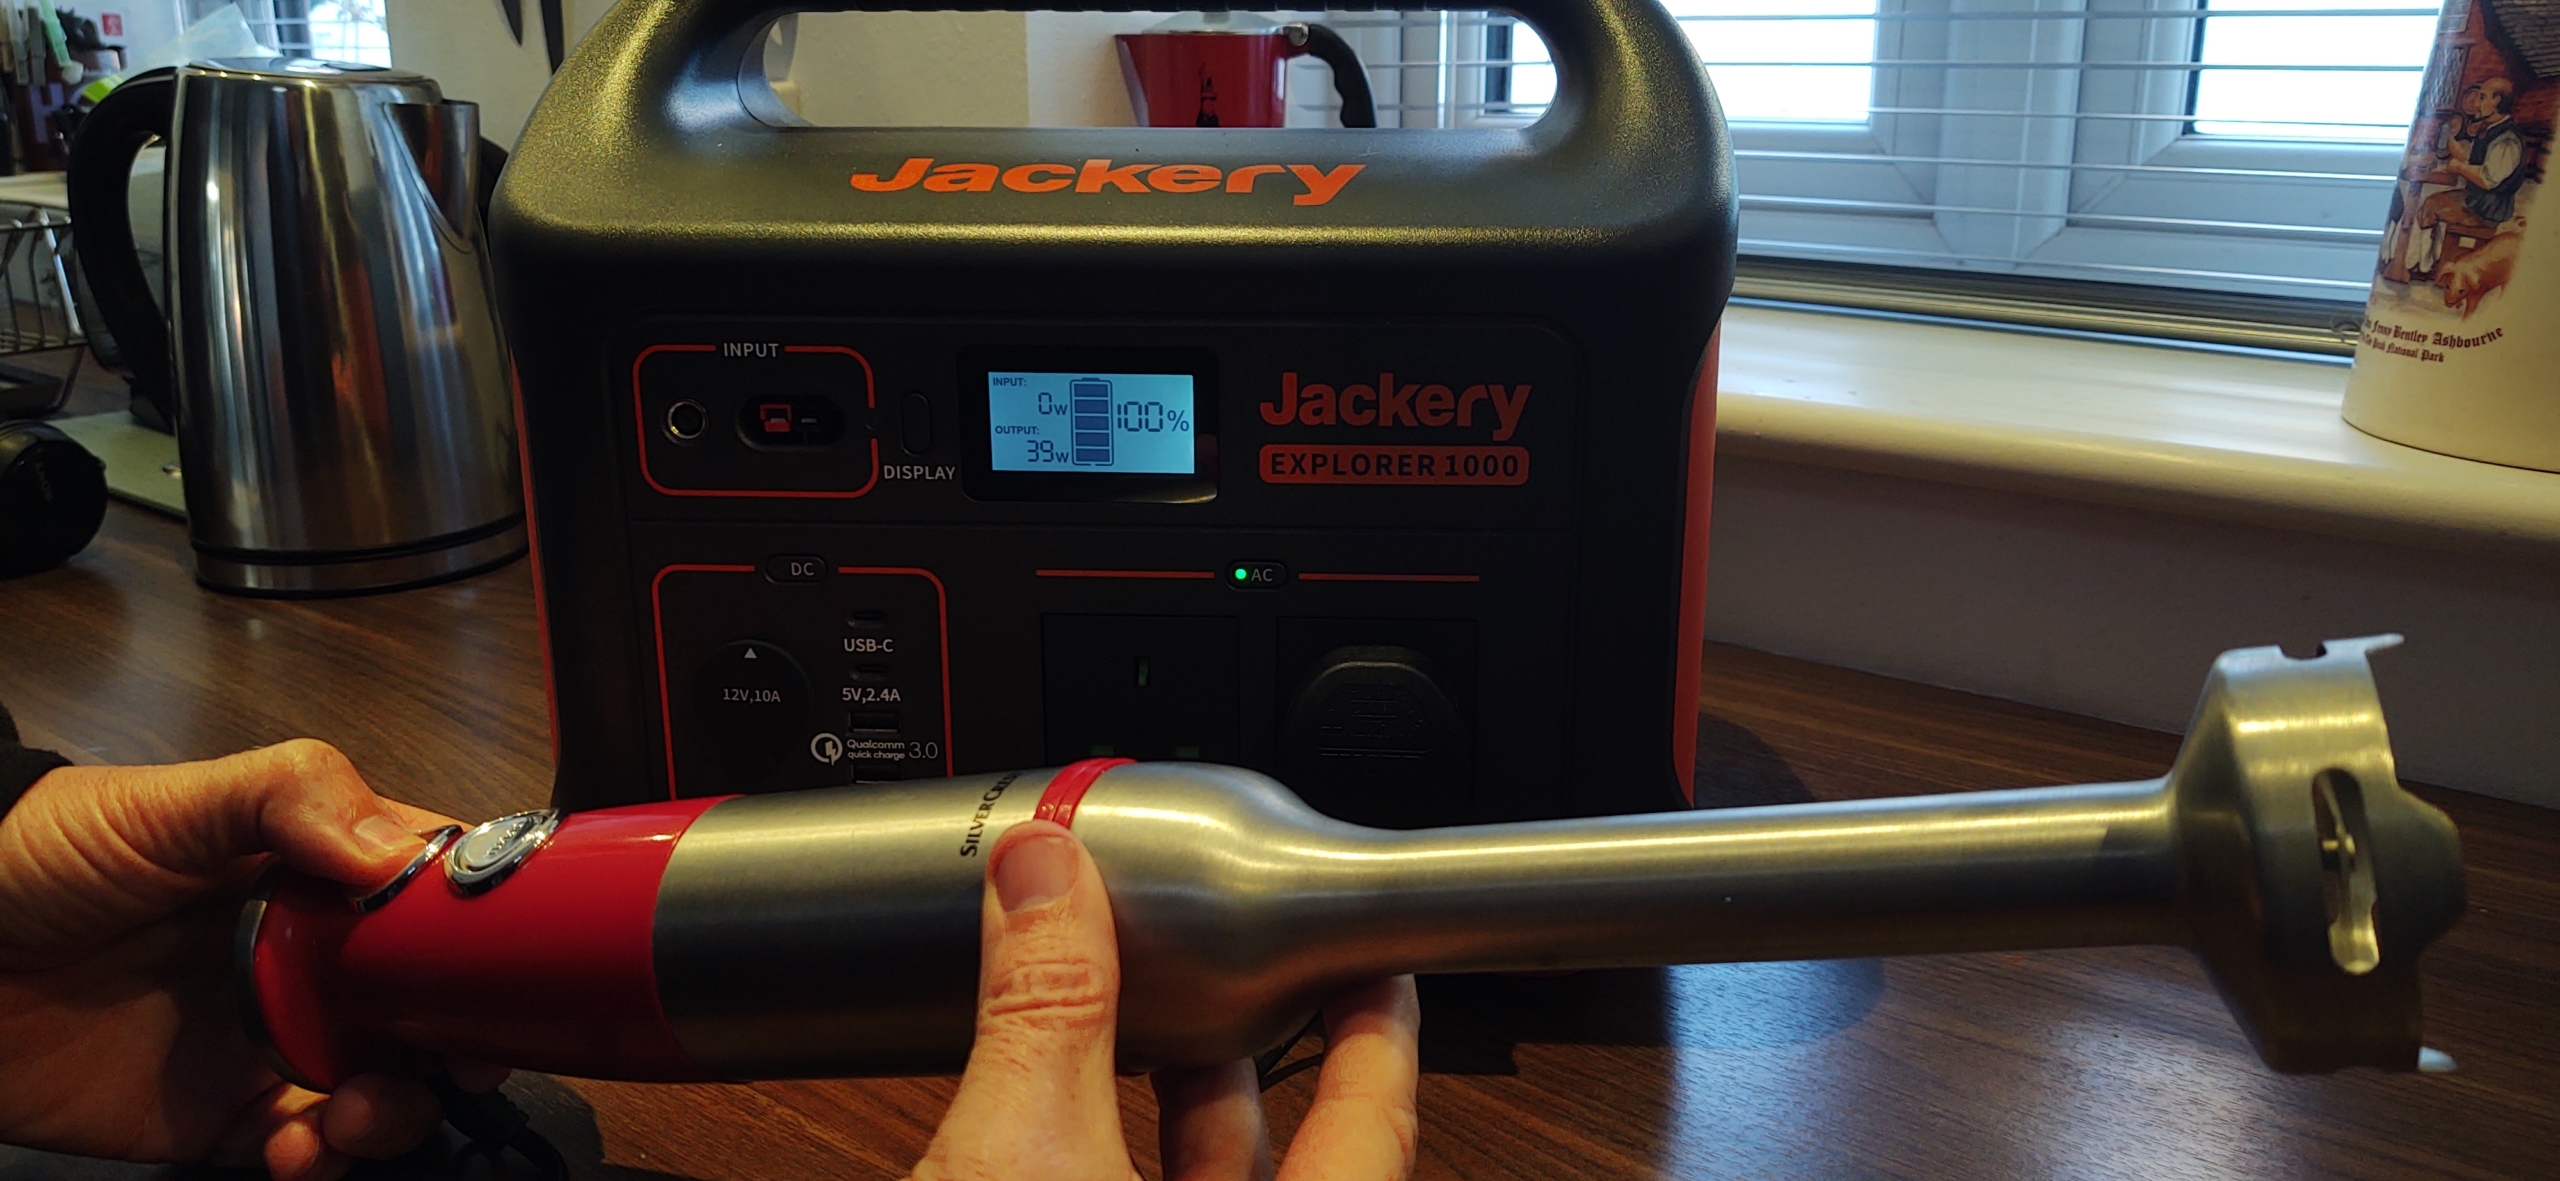
The Explorer isn’t small, but it’s not huge either. It weighs 10Kg, which is fine for us to carry around the van and maybe a few hundred metres outside but we couldn’t go hiking with it. The display panel shows the percentage charge state of the battery, how many Watts are going in (when charging) and how many are coming out (when you’re charging from it). You can run stuff from it while it’s charging, but Jackery warn this reduces battery life.
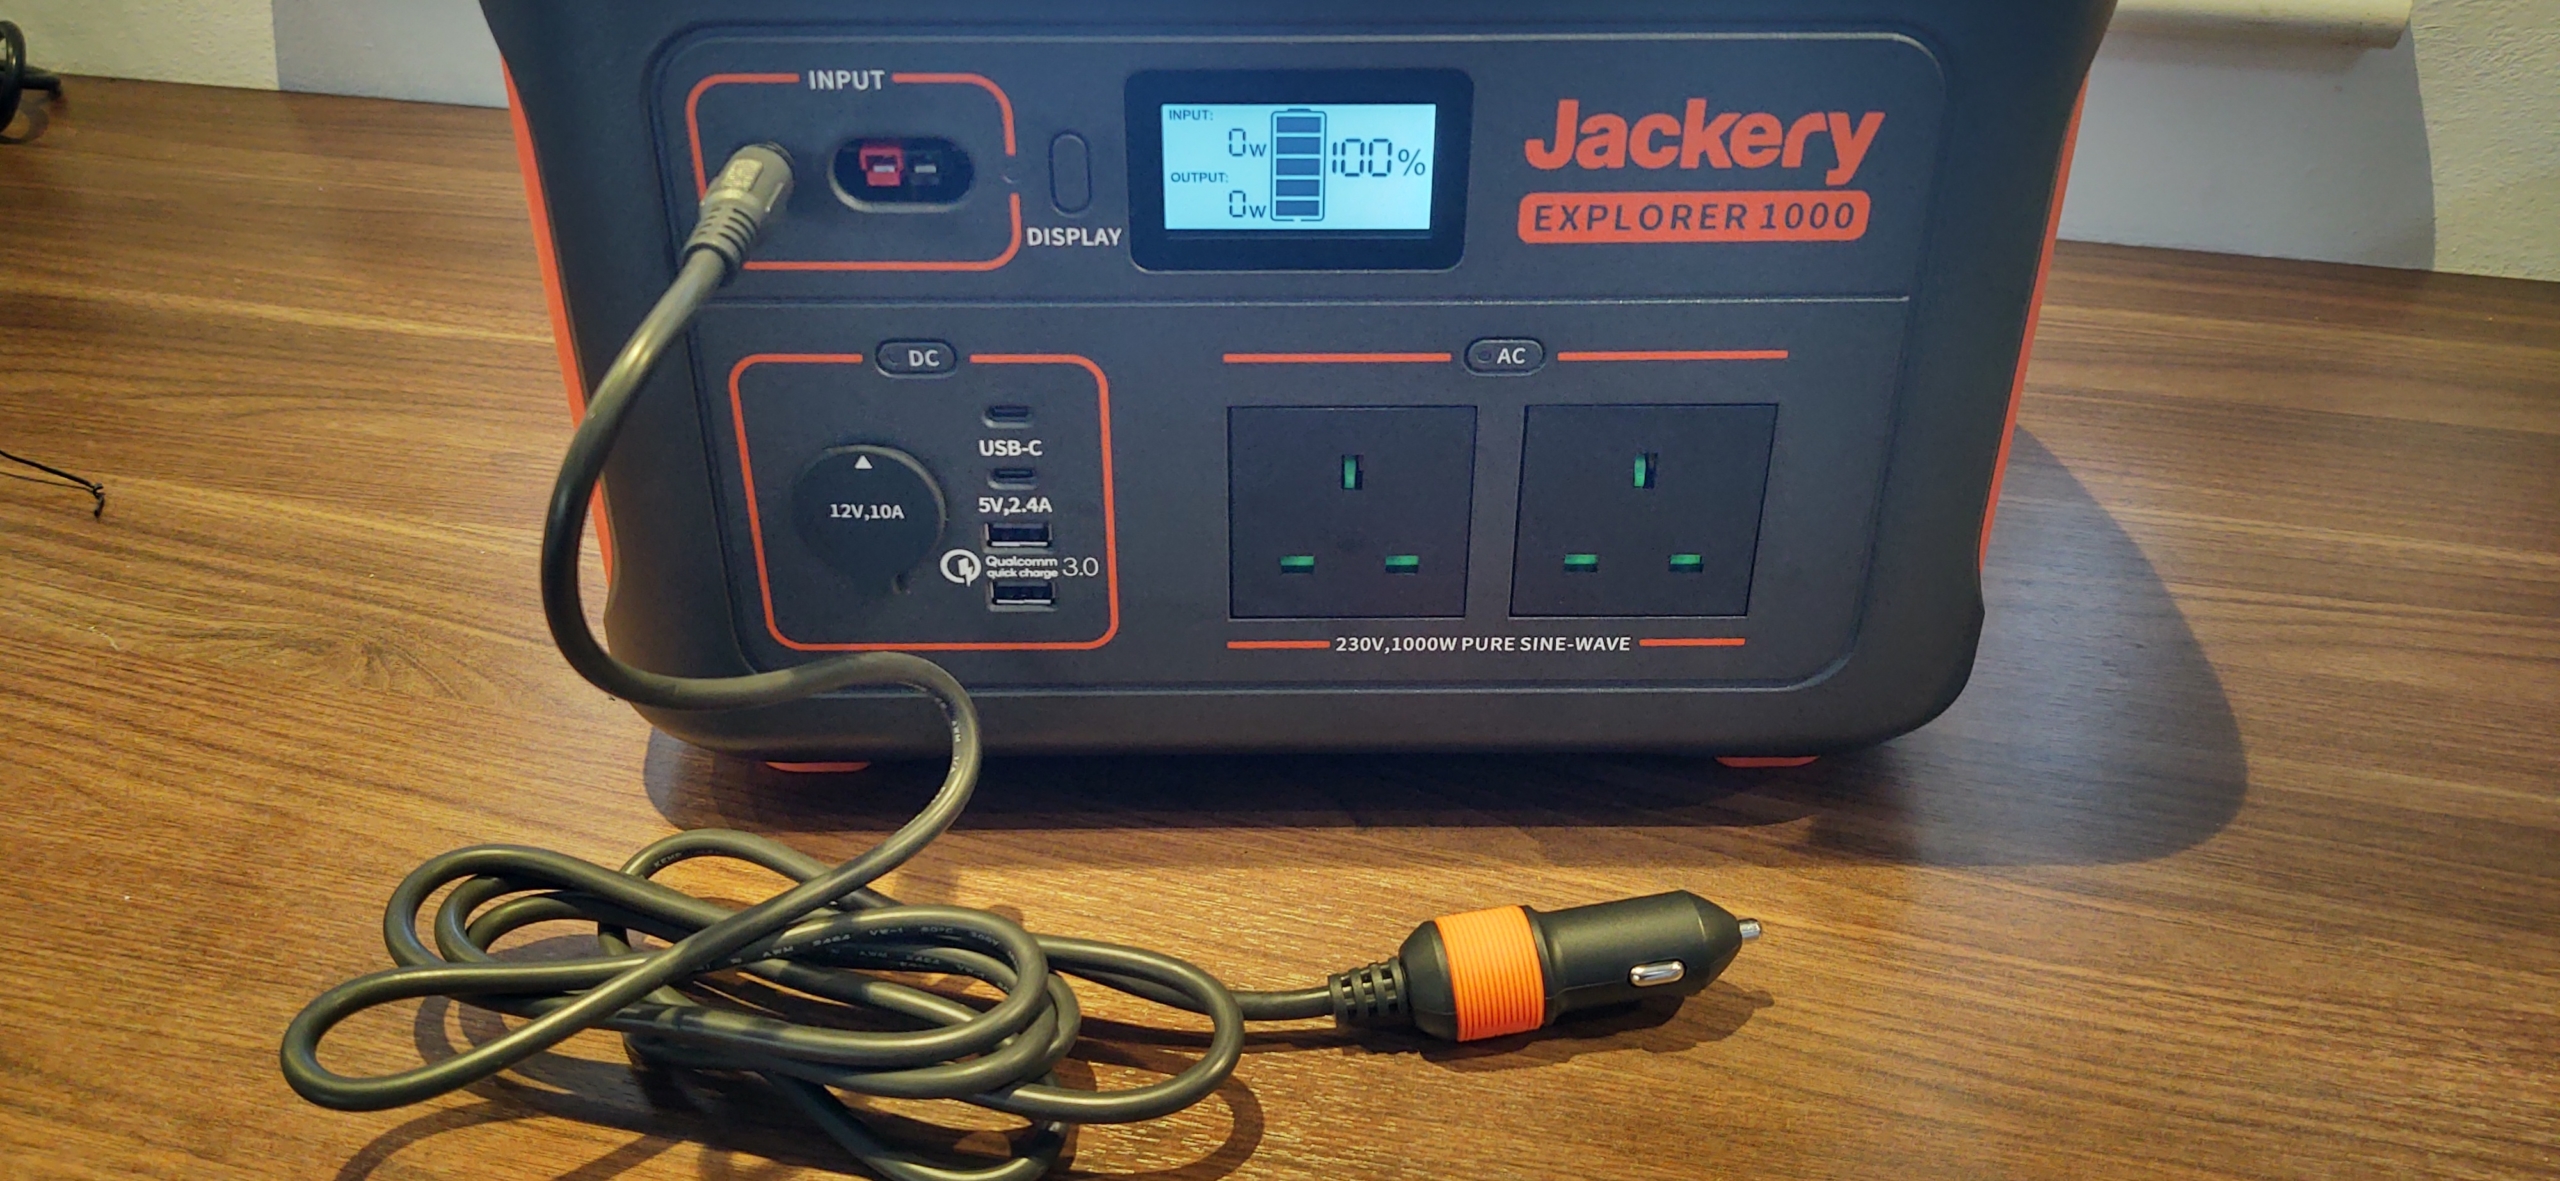
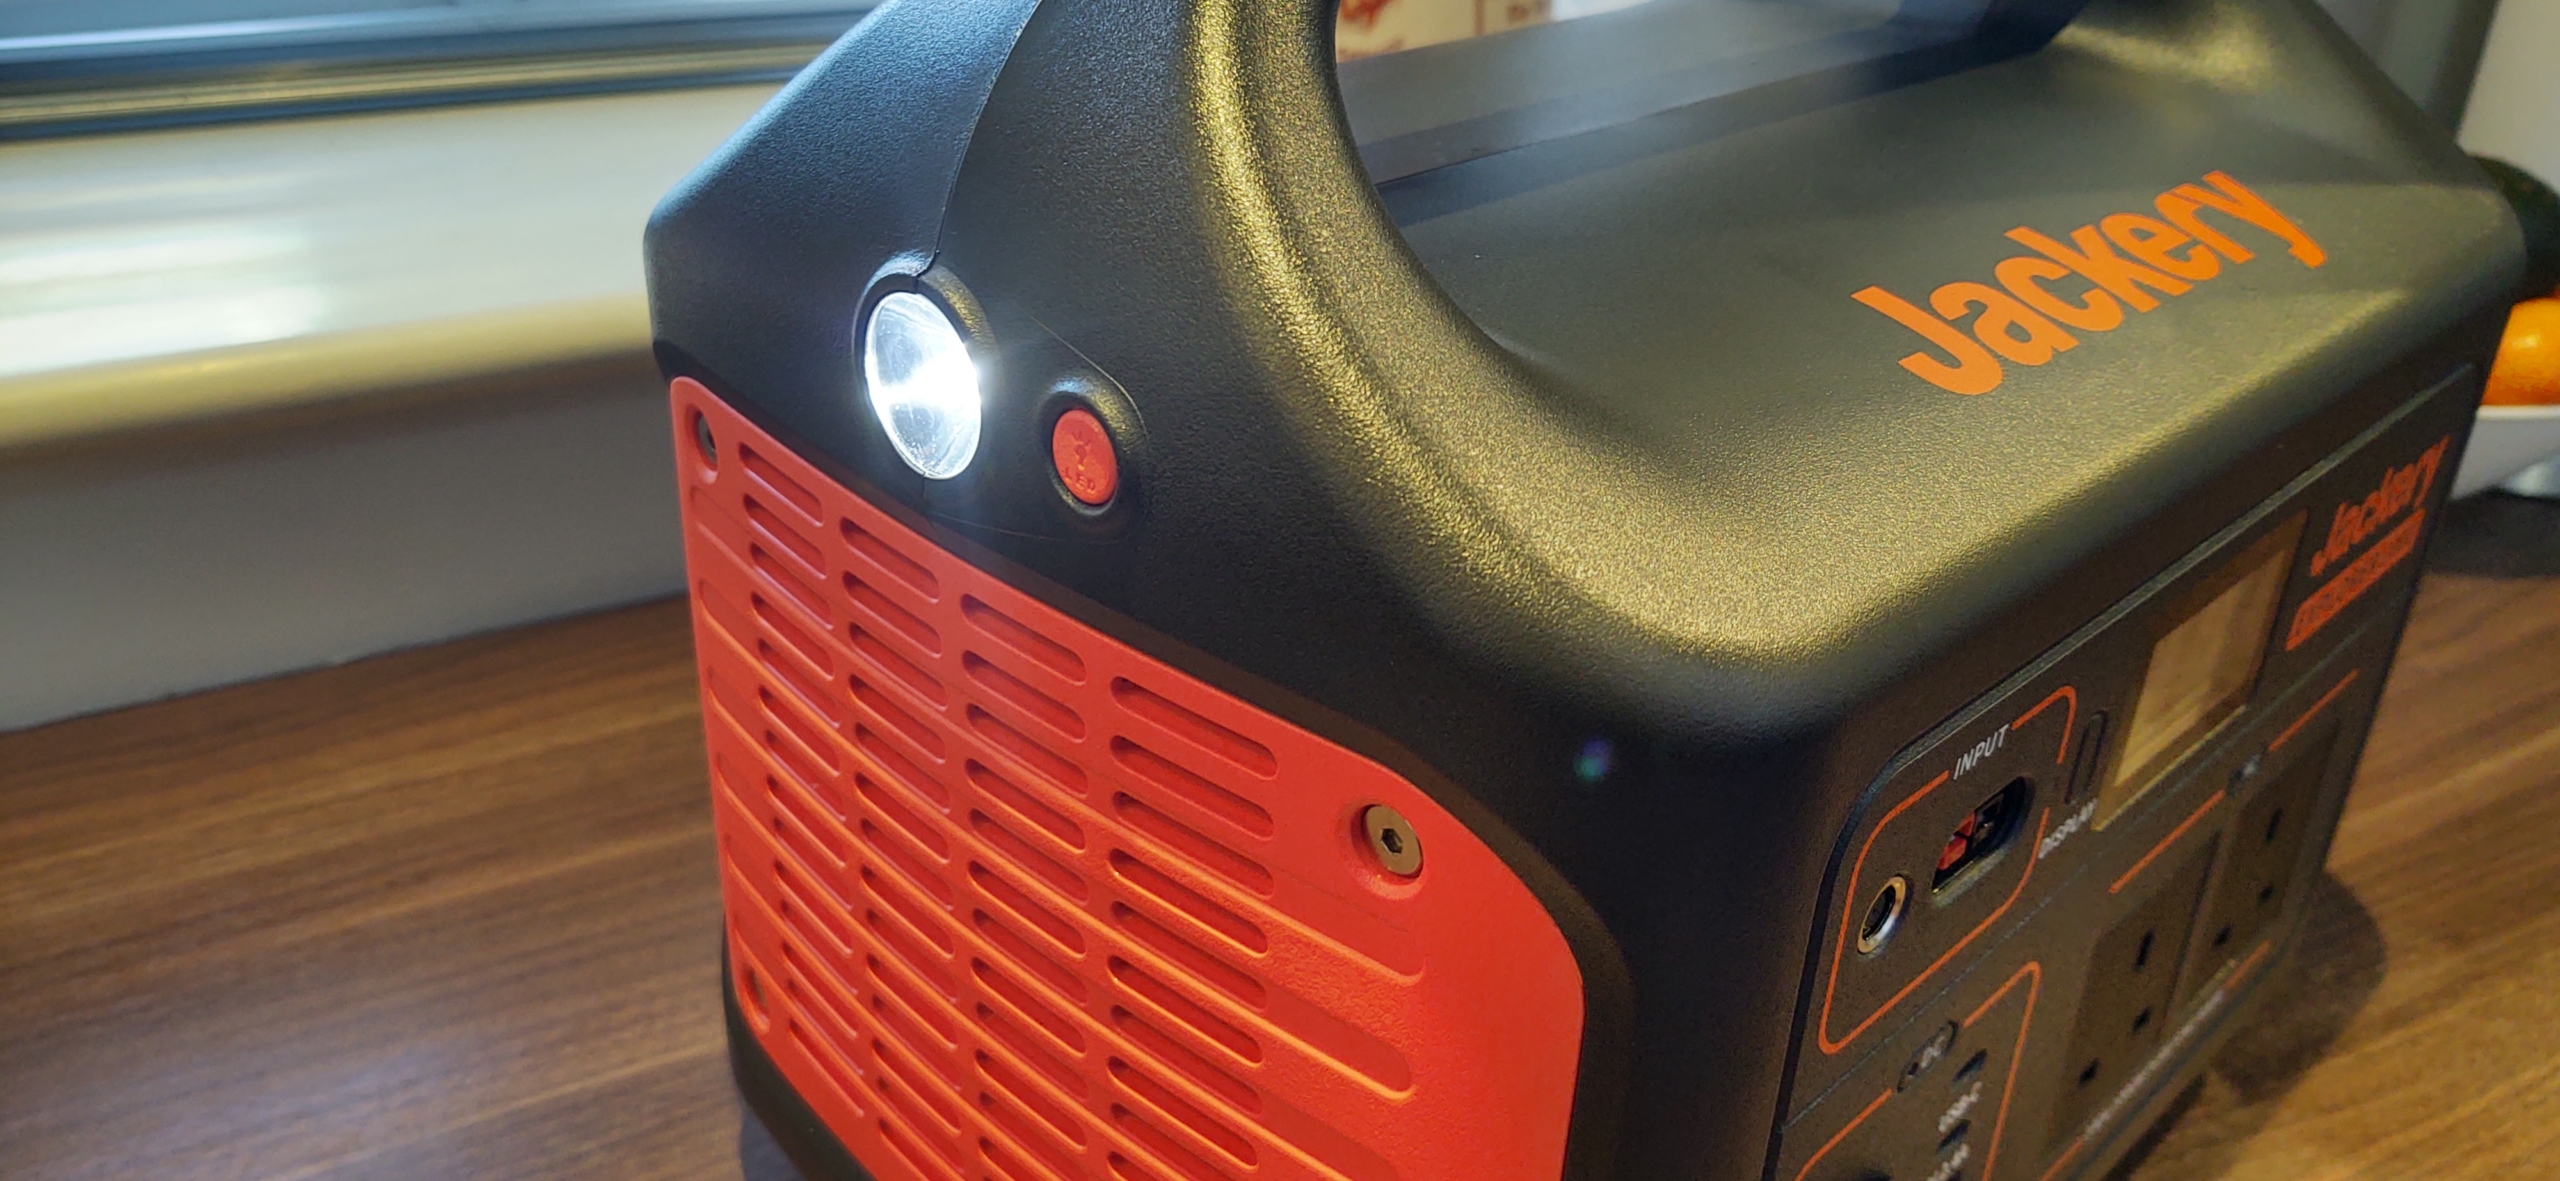
To the top left are the charge input connectors. You can plug the mains charger in here, or the 12V ciggy socket one or a SolarSaga panel (if you’ve got one). If you have two SolarSaga panels, the Explorer comes with an adapter so you can plug them both into the red and black connector.
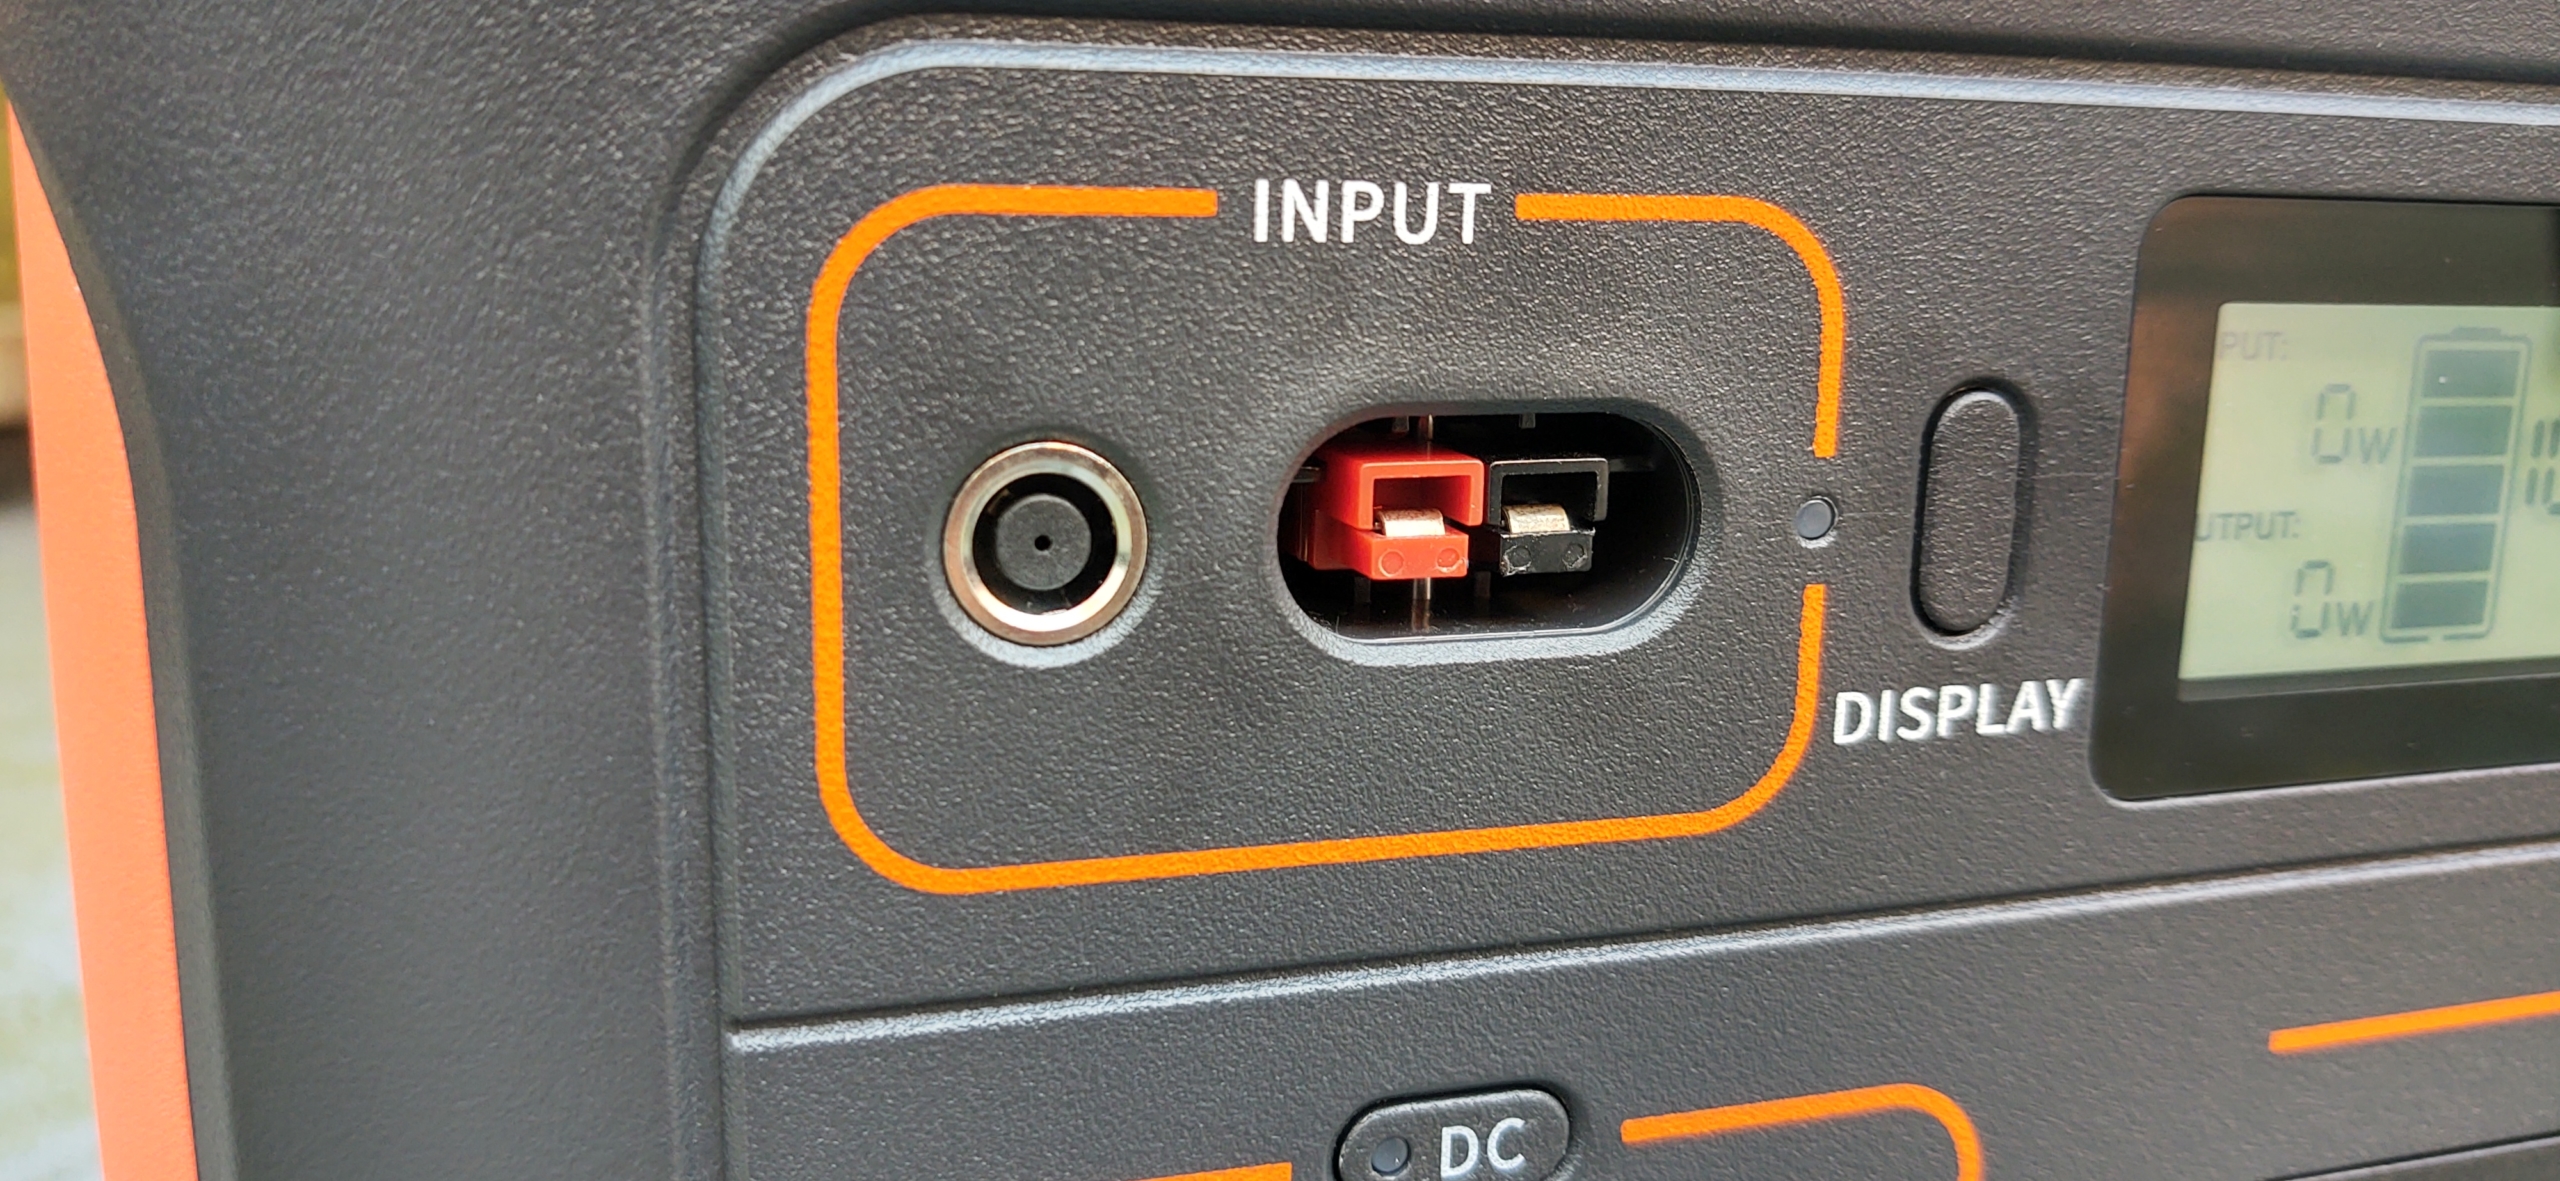
To the bottom left there are the ‘DC’ (direct current) outputs, two USB C and two of the older rectangular USB A ones, one of which is fast charge. There’s also a cigarette ligher socket for powering anything with that style connector. You have to push the DC button at the top for power to start flowing to these sockets (and turn it off when you’re done).

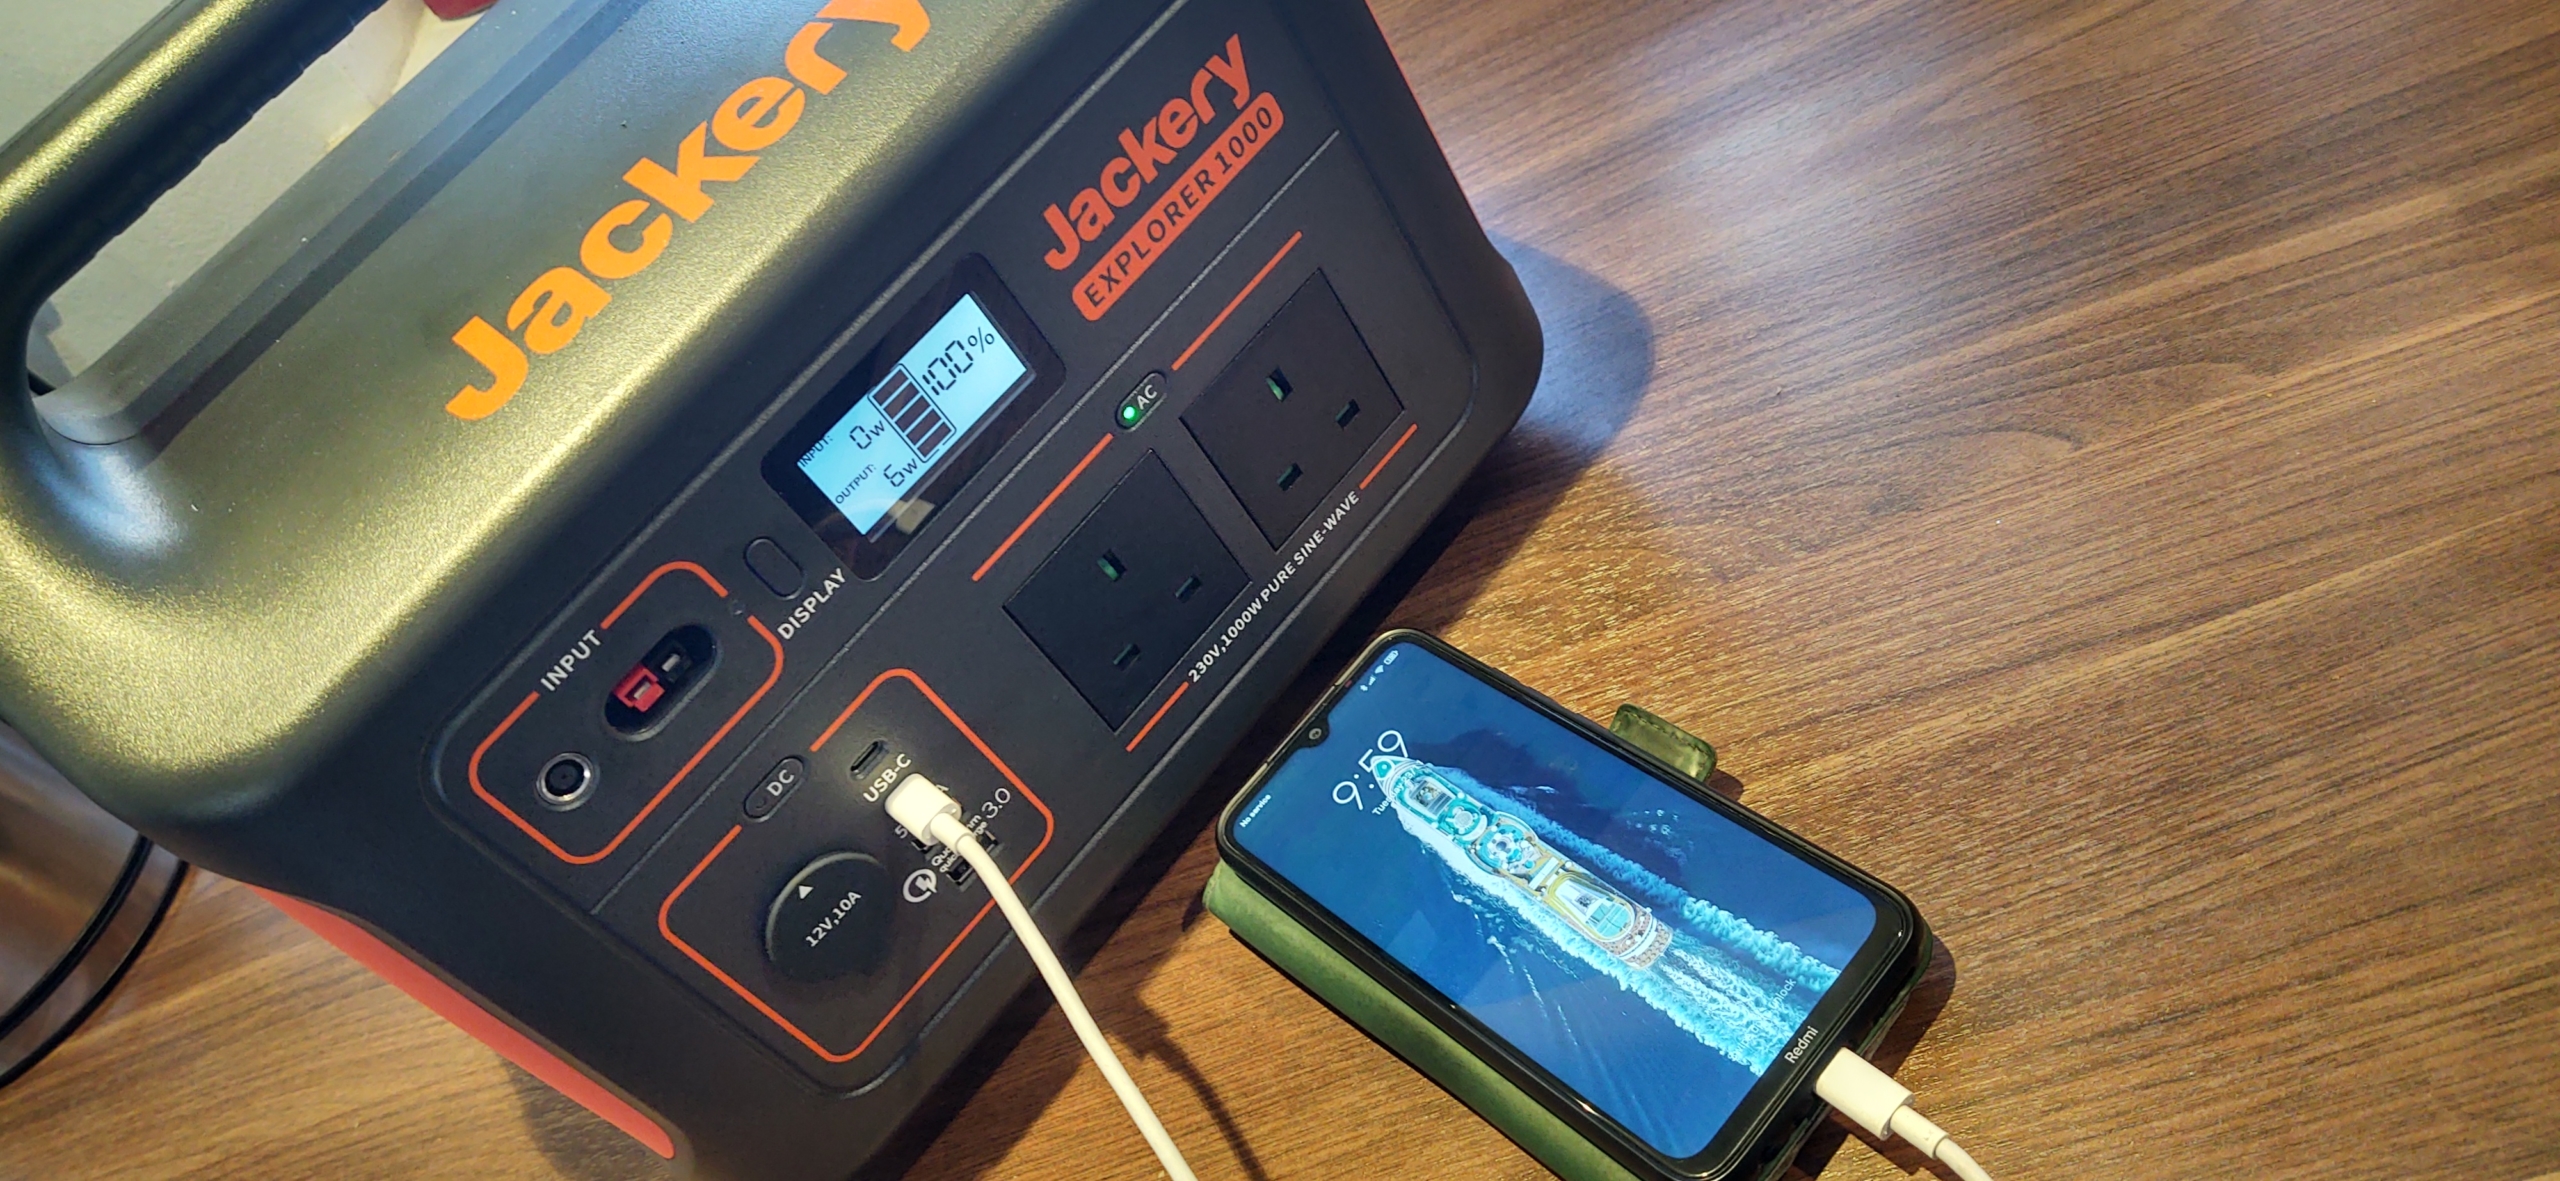
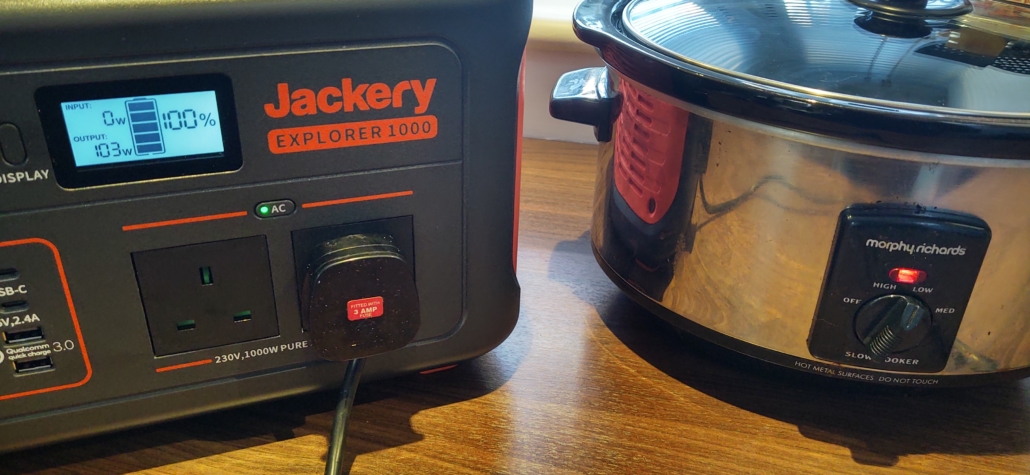
To the bottom right are two ‘AC’ (alternating current) UK-style three pin mains sockets. You can plug in two things at once as long as they don’t need more than 1000W combined. Eyeball the labels on your electrical equipment, that should say how many Watts they need, or have a look at this list to get an idea how many Watts typical equipment need. For example, a house electric kettle typically needs over 2000W (2kW), so won’t run on the Explorer 1000. A travel kettle might use between 600W and 1kW, so should run OK.
Our van has three mains power sockets. One is in the kitchen, one behind a seat and one on the outside of the van. These are only live when we’re hooked up to the mains. The outside one is next to the habitation door, and is very handy for cooking on a hotplate or Remoska without running an extension lead out the van door. If we didn’t have this, or when we’re not hooked-up, the Explorer’s two sockets have the advantage of being portable, so we could run mains kit anywhere we can place the Explorer, without running cables. That might be quite useful in future.
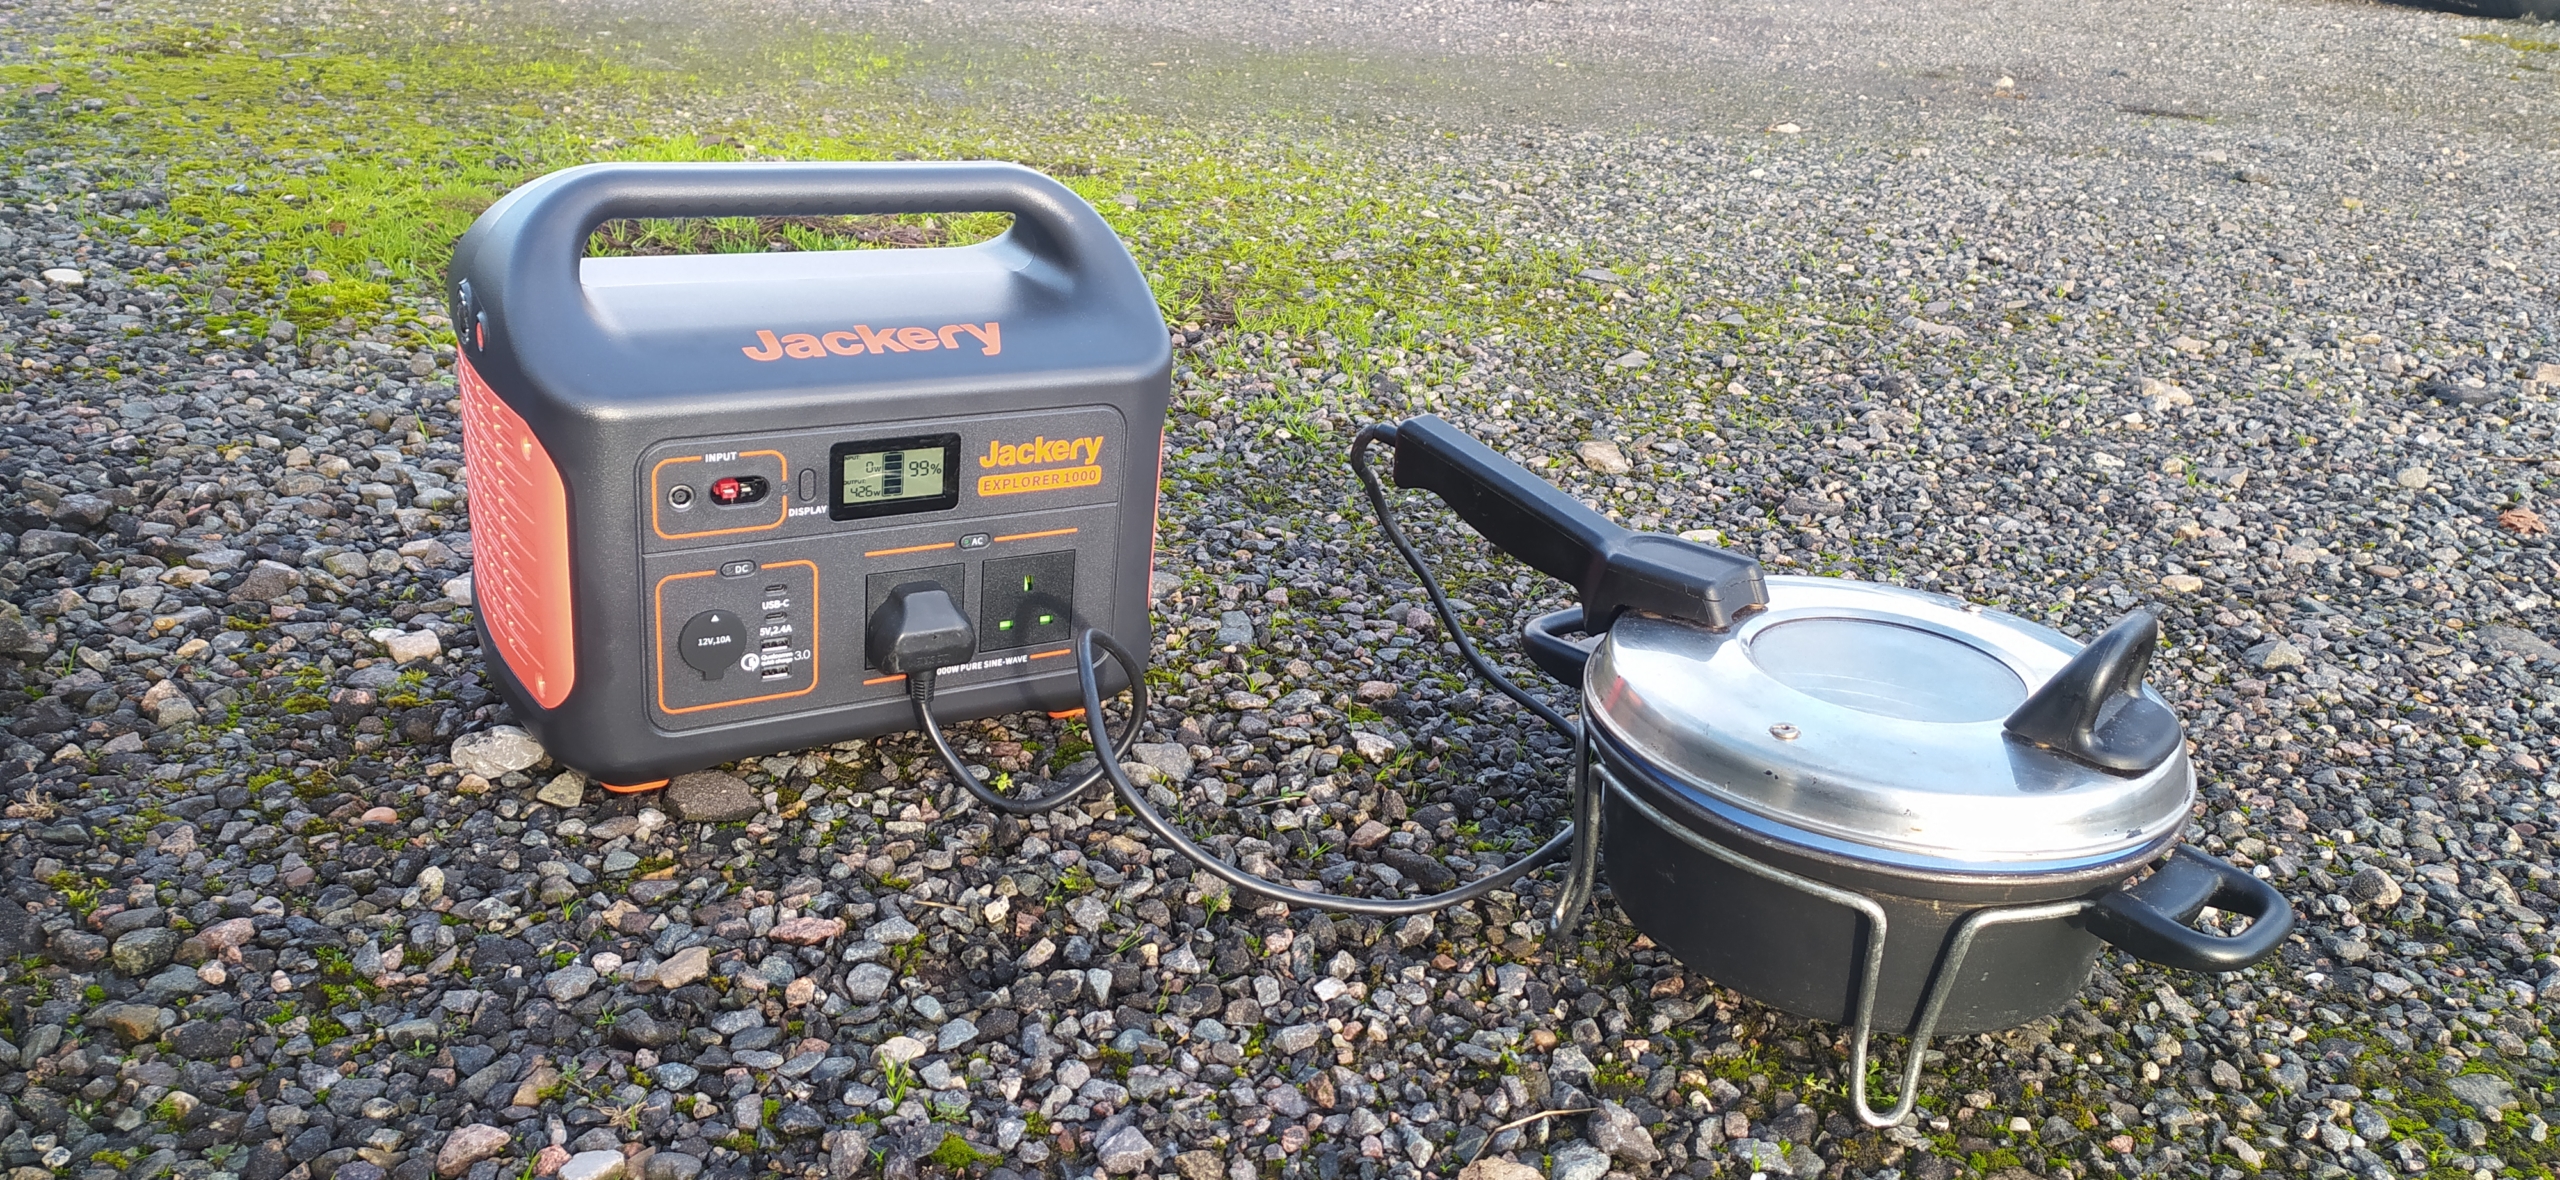
The Explorer’s mains sockets are powered by the built-in inverter and a fan will kick in if it starts to get warm, which might be a tad irritating if you’re reading or trying to watch telly at the time. If you try and run something too powerful, built-in protection switches the inverter off. Again you need to push the AC button to get power to flow, and push it again when you’re done.
The display goes off automatically but not the sockets, and these will drain the battery if left on and not in use (they eventually turn off on their own).
Finally the Explorer has a light on one end, making it the world’s heaviest torch!
Next up, the SolarSaga panels.
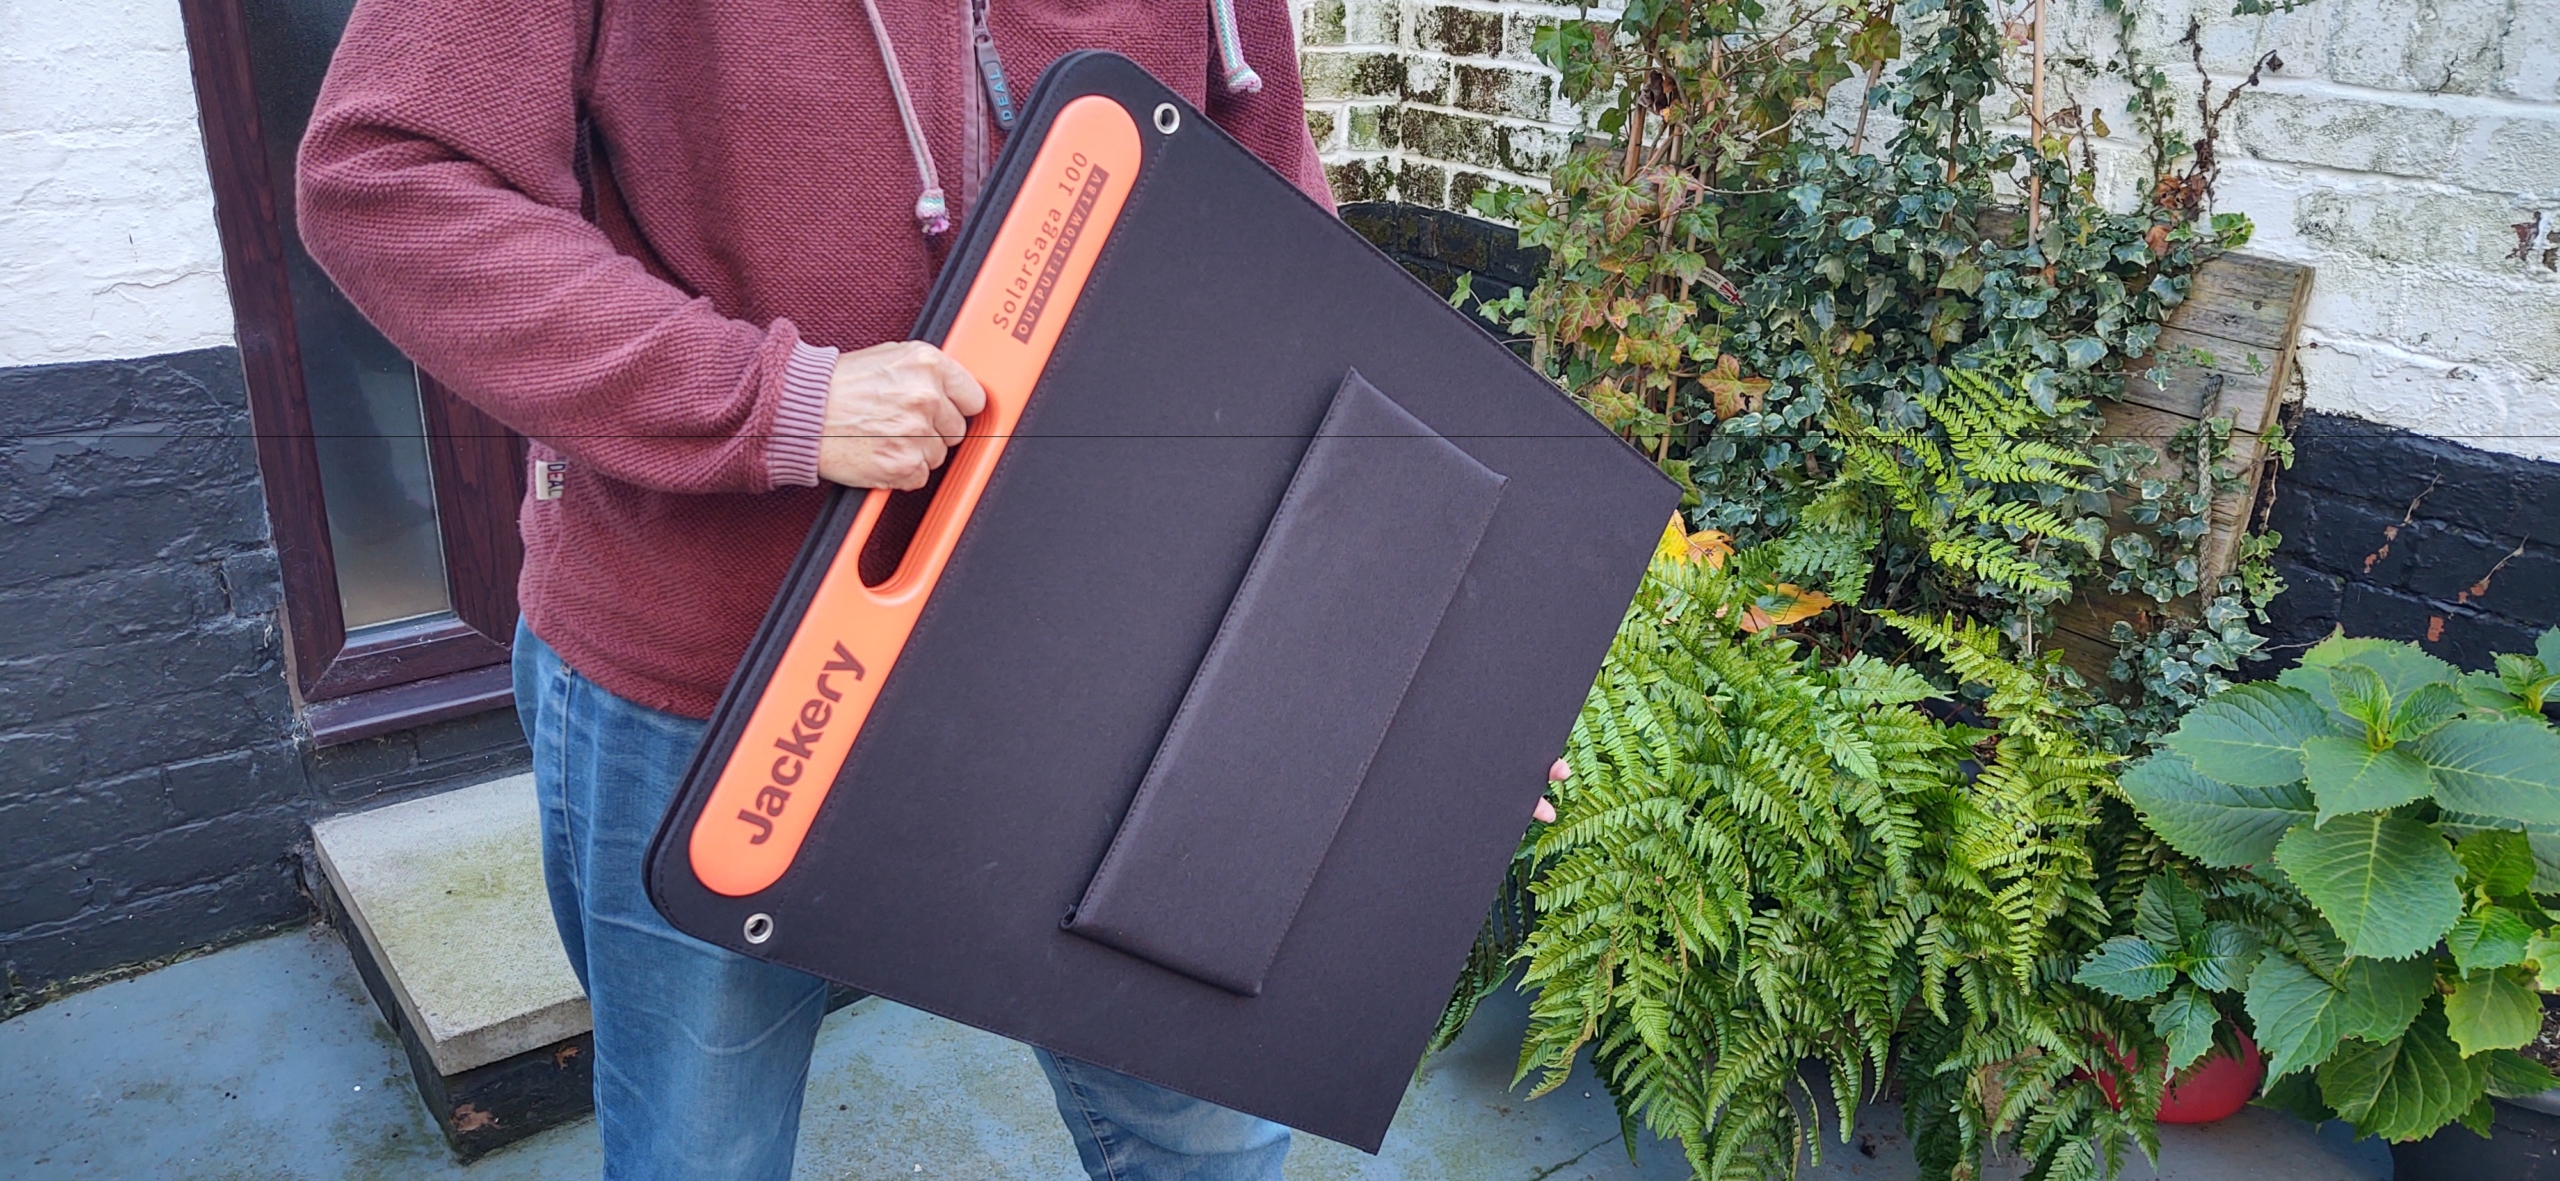
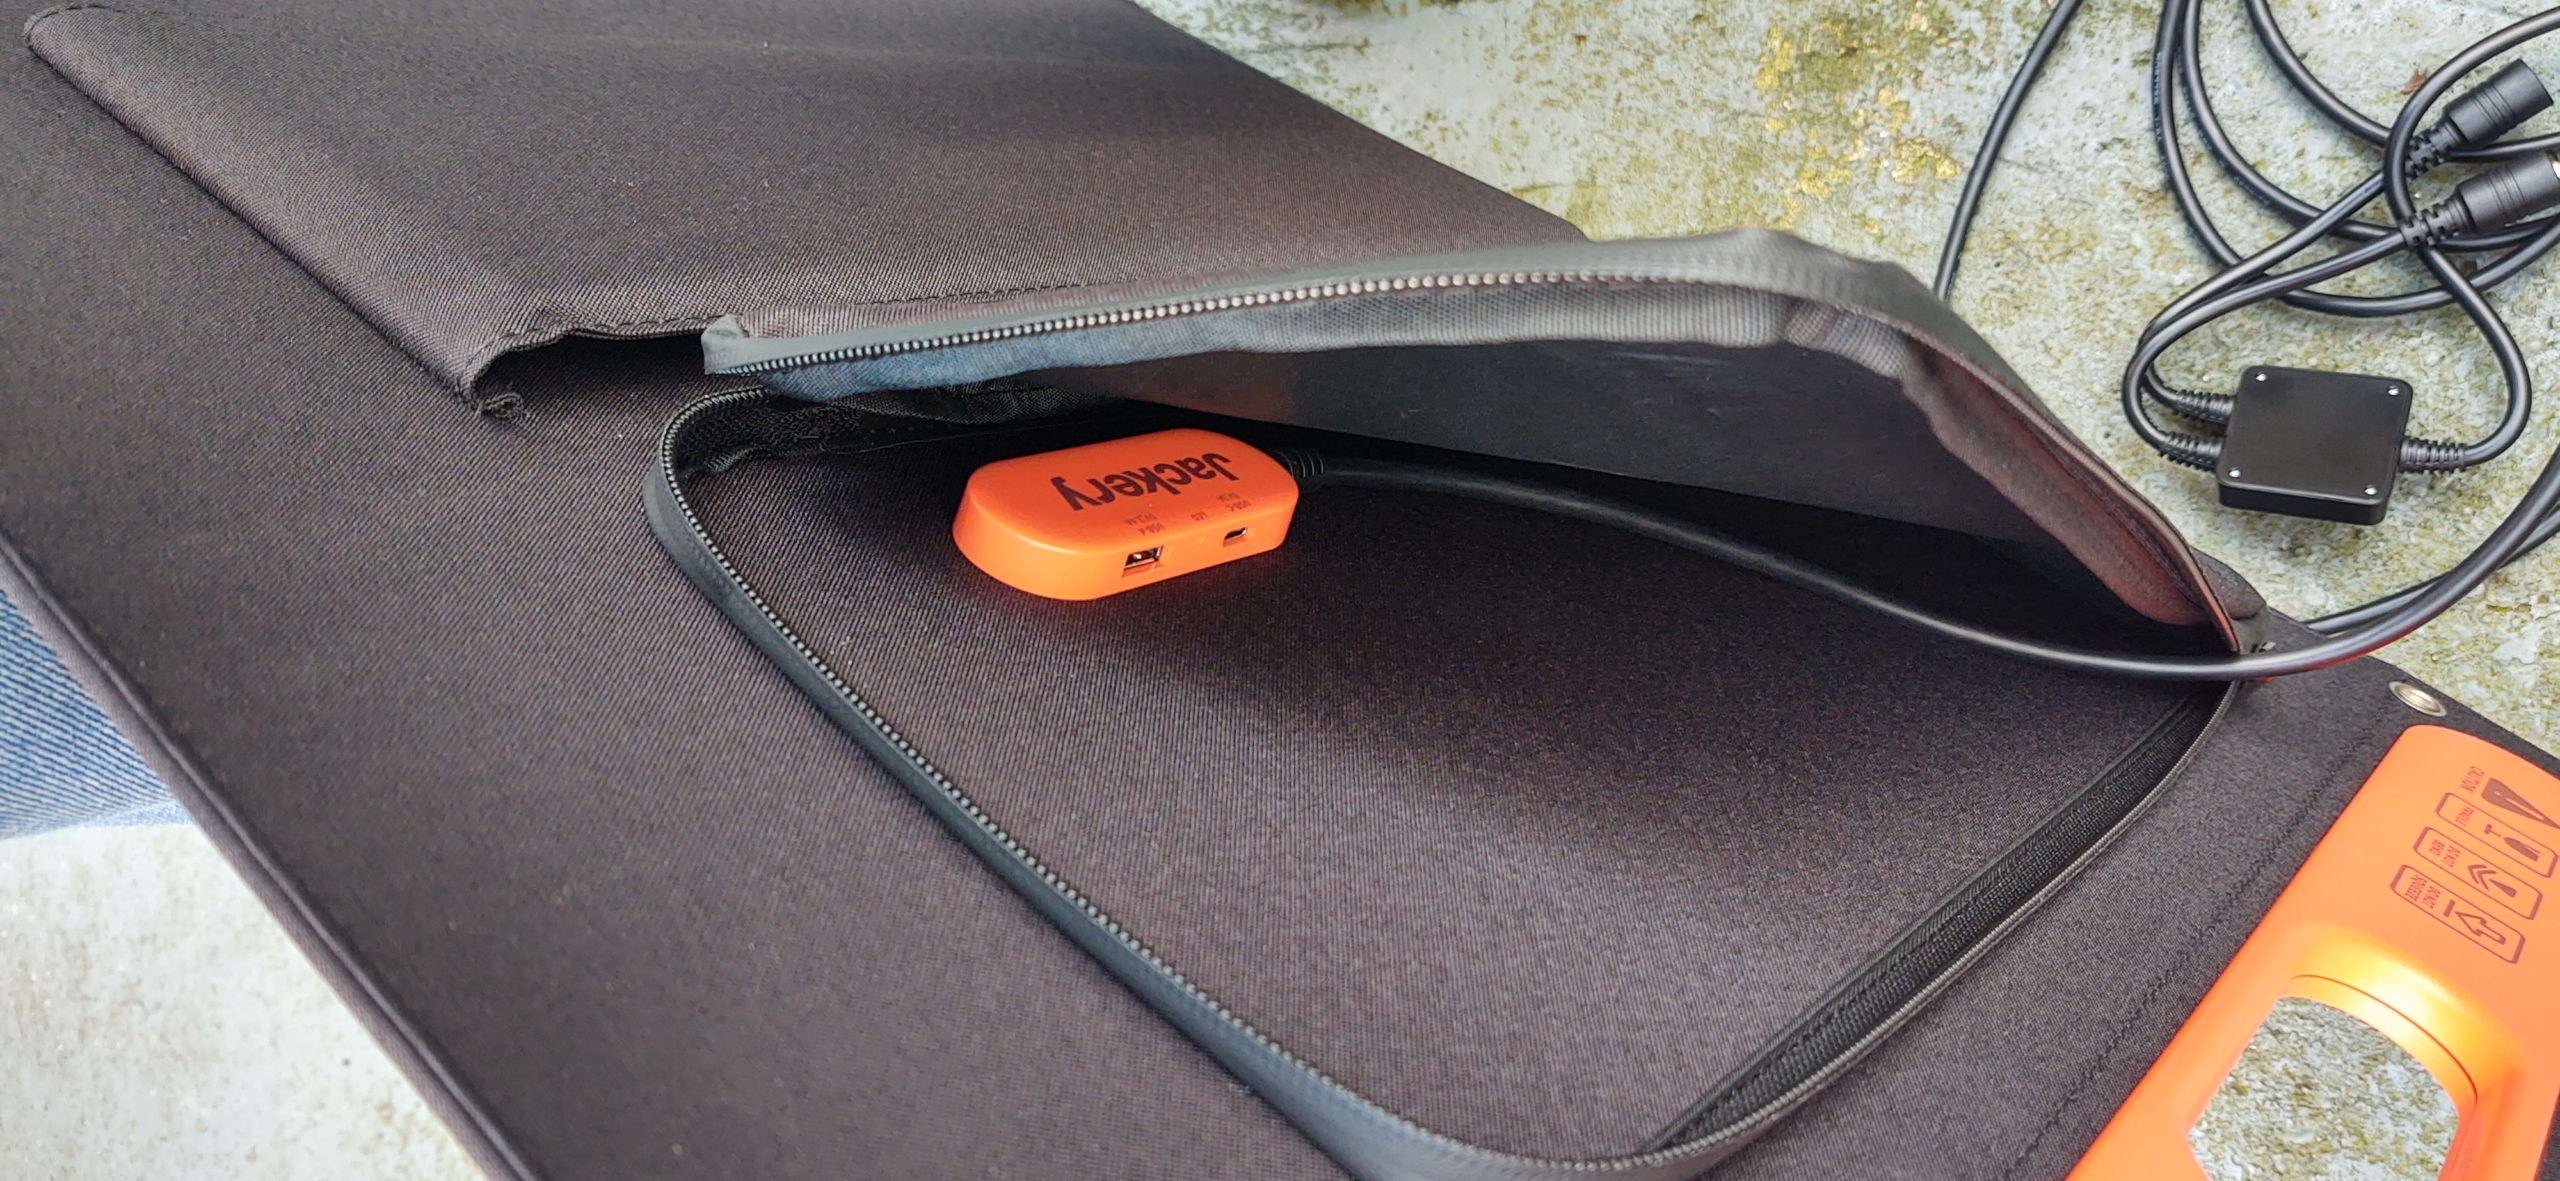
They’re folded in half when stored, the sides held together with built-in magnets. They each have a carry handle. On the back they have a zipped-up pocket which keeps the Explorer recharge cable tidy and has USB C and USB A connectors, so you can plug stuff directly into them, if you want to.
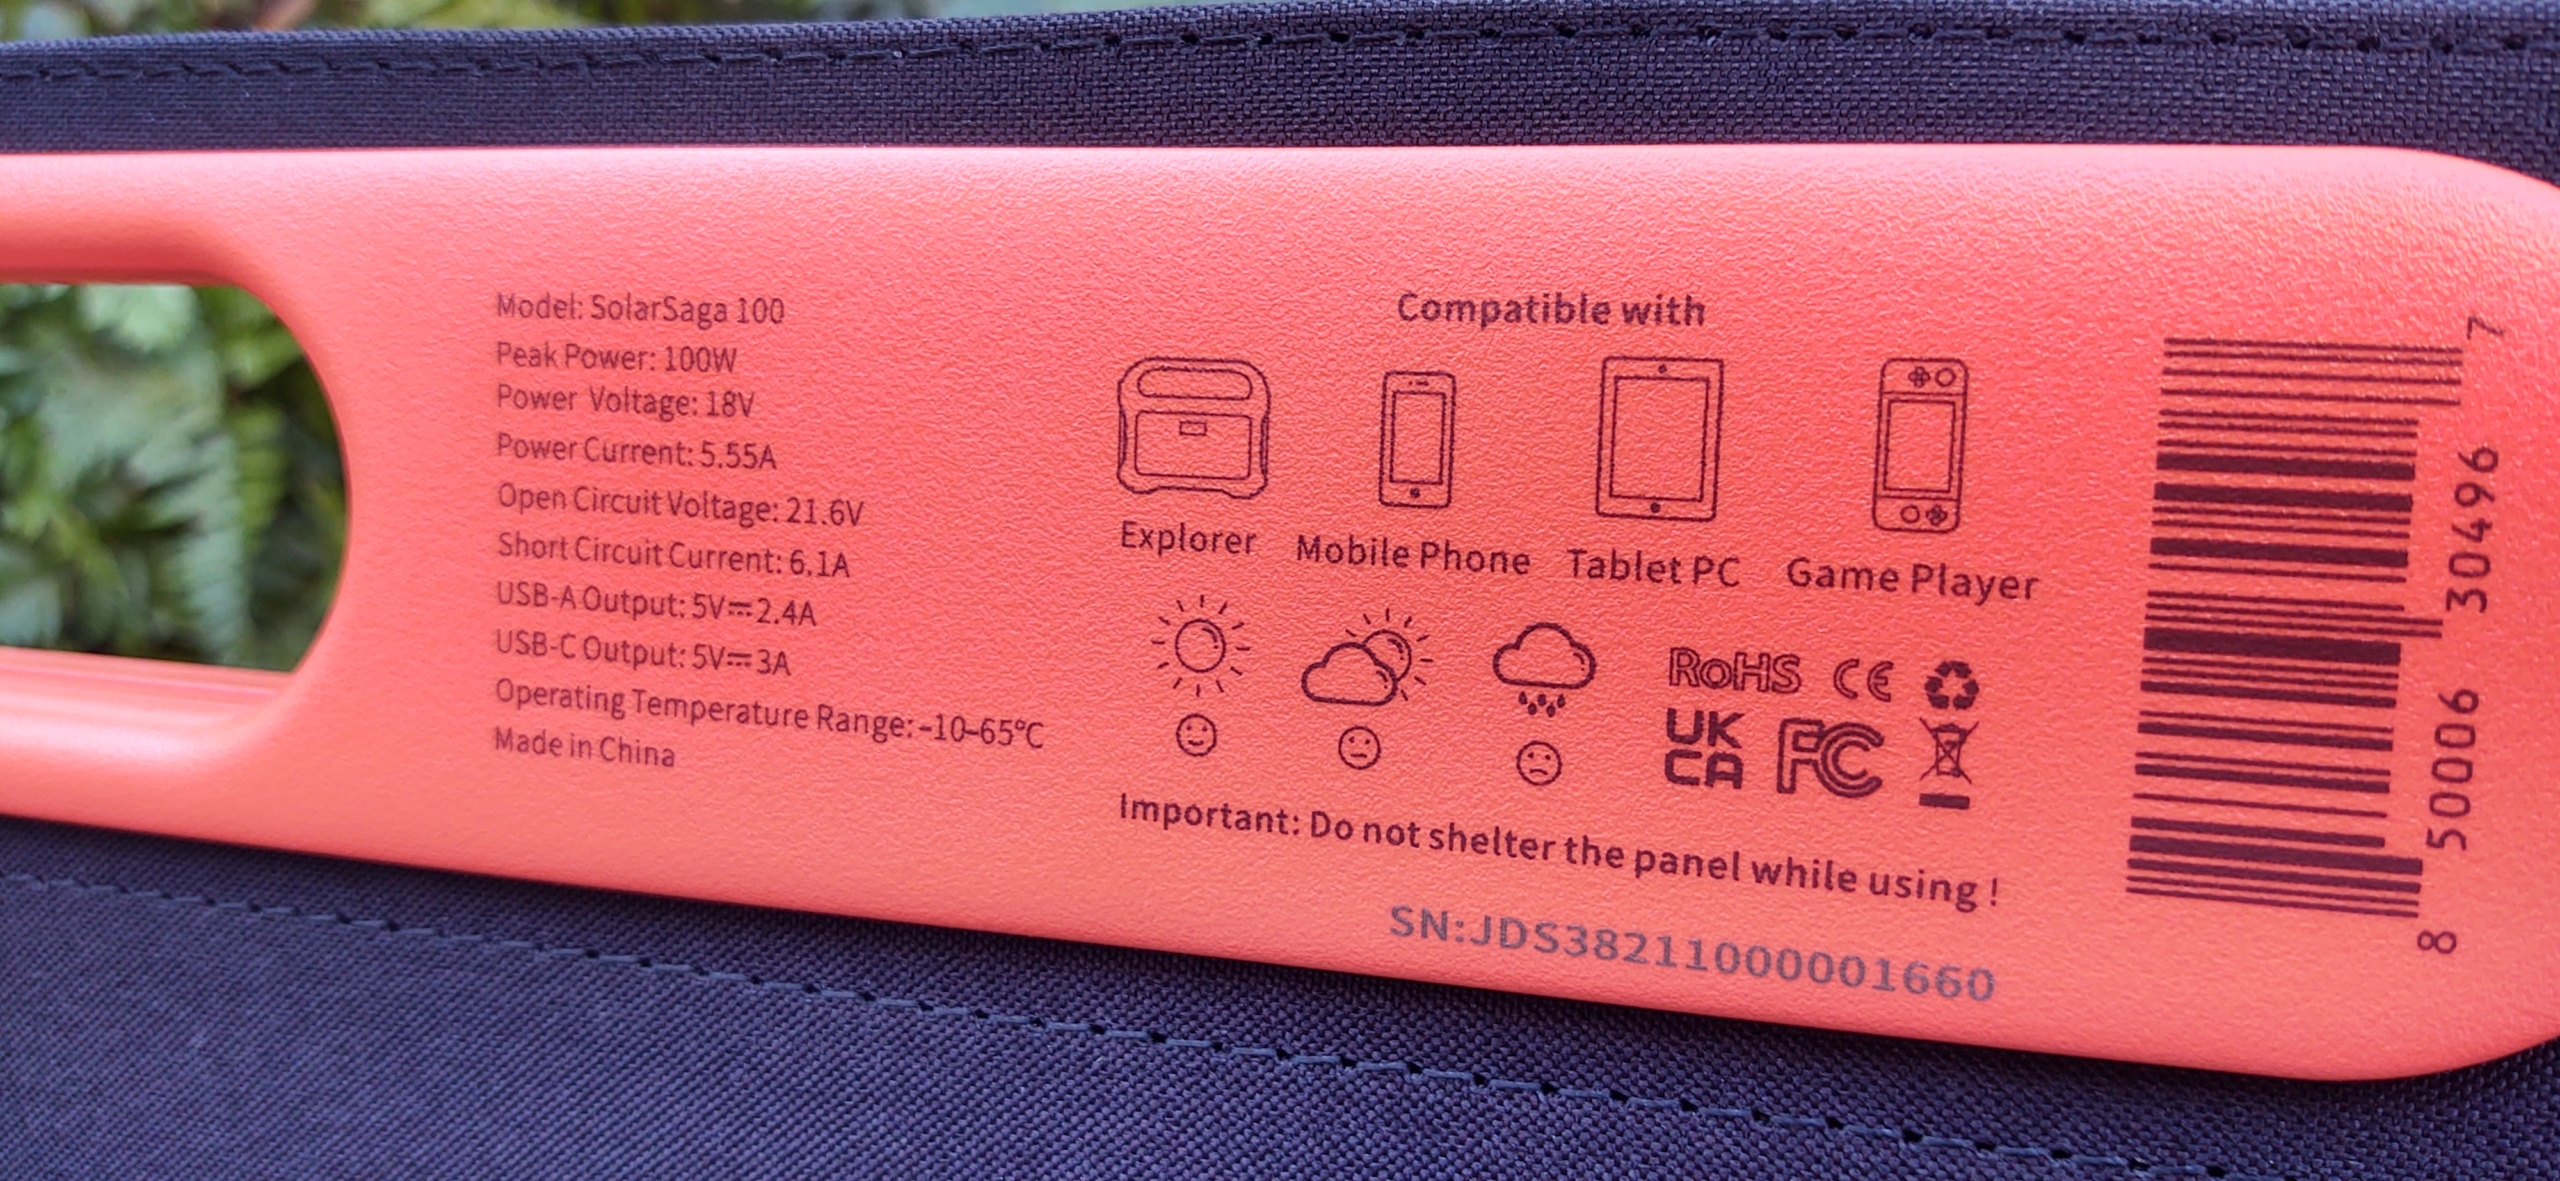
You can prop them up with build in stands. These are held to the back with velcro, which is the only bit which doesn’t feel very durable to us.
You just plug a single panel into the Explorer directly, or use the adapter to plug in two panels. The display shows an increase from 0W input and you know you’ve connected the panels correctly. When you’re done, you just unplug them and pack them away.
The whole thing seems pretty intuitive.
How Else Might You Spend Your £1,500?
There might be better ways to spend your hard-earned, depending on your van, space available inside or on the roof, how long you plan to keep it, whether you’d use the Explorer or panels for other uses and so on:
- Buy a good quality suitcase generator. Honda ones have a good reputation, but cost about £1,000. The main problem with these gennys is noise. Even the best ones make a steady background rumble. When you’re sat on a beautifully quite campsite, aire, wild camping spot or camping field, even the quietest generators are irritating. More so when a neighbour (or someone the other side of the field even) is running it at night. We once bought a generator but only used it twice, the noise was too much.
- Buy a Solar Generator from another manufacturer. Jackery seem to be the ‘Apple’ of Solar Generators. They have a great design, are easy to use and appear to get good post-sales support. But they’re far from the only players in the market as you can see in this (US-focussed) Buyer’s Guide video.
- Install a larger or second lead-acid leisure battery. Halfords sell a 110Ah leisure battery for £110. It weighs 20Kg though, which is twice that of the Jackery 1000’s 10Kg weight. It also only lasts for 200 charge-discharge cycles, less than half the Jackery (these numbers refer to the battery losing 20% of its capacity when new – they can still be used for potentially years longer).
- Upgrade your van’s leisure batteries to Lithium Iron. LiFePO4 batteries are the bee’s knees of leisure batteries. Lighter and longer-lasting than lead-acid. Quicker to charge and can handle more powerful devices. Can be discharged all the way to 0%, so the entire capacity is available. Cracking stuff, the future no doubt. But they currently cost a fair bit up-front. An EcoTree 100Ah Lithium Iron battery will set you back £850. And unless you’ve a newer van, you’ll need to install a battery to battery engine charger and replace your solar and mains chargers too. We dunno how much that might be to get done by a professional (we personally wouldn’t tackle it ourselves due to the fire/electrocution risk). Our van’s 20 years old now and we’re loathe to invest maybe £1,500 or more in the electrical system. At least with the Jackery stuff we can just carry it out when we move to a new van.
- Install a 1kW inverter in your van. If you like the idea of running more powerful mains kit in your camper, a 1kW pure sine inverter can be had for about £130. You could hook this up to your existing leisure batteries and get the same features of the inverter provided in the Explorer. Just be aware running powerful stuff will rapidly deplete your batteries, leaving you unable to run your lights, heating and so on. The good thing about running stuff from the Explorer is it doesn’t touch your van’s leisure battery, leaving it ready for all the critical stuff like running your water pump.
- Install one or more solar panels. Long-term tourers and full-timers tend to have at least one 100W solar panel on the roof, and in some cases the roof’s covered in ’em. Solar panel kits can be had for £100 from Amazon. You might want to pay more a higher quality one with an MTTP charge controller (the Explorer has one of these built-in). Getting someone else to fit it will significantly crank up the cost – motorhomeworkshop.co.uk quote £544 to supply and fit a 120W panel.
Parting Thoughts
Would we have bought the Explorer if we weren’t given it for free? Very doubtful. But having gotten our hands on it, we’re not going to sell it or give it away either. It looks:
- (a) good quality,
- (b) fun,
- (c) easy to use,
- (d) powerful and
- (e) portable, and overall more useful than we initially thought.
The panels look good quality too, but we’re really unsure how much use most motorhomers would get from them. That said, if you’re often parked in the right kinds of location, being fully self-sufficient for power would be pretty cool and may well be worth the investment to you.
Still Interested?
Here are links to the product details on Amazon UK:
- Explorer 1000 – details here on Amazon
- SolarSaga 100W Panels – details here on Amazon
- Explorer 500 – details here on Amazon
- Explorer 240 – details here on Amazon
Cheers, Jay


We decided to make the leap and go lithium. We had one 95ah leisure battery and, whilst we are not ‘heavy’ power users (2-3 hours of TV per night and one or 2 led lights on), we felt anxious when also needing the heater fan, water pump etc.
After much research, we found that it was possible to fit not one, but 2 110ah EcoTree batteries under the passengers seat. As you indicate, other gear is necessary to get the best out of lithium batteries. So our solar controller was upgraded to a MPPT type (increases the solar ‘yield’ apparently), we replaced the 230v charger to one that has a lithium battery setting. The last was fitted exactly where the original charger was, on the distribution unit.
We also had a battery to battery charger fitted and a smart shunt which acts as battery monitor. Both of these also fitted under the passenger’s seat.
All very neat and the weight of the lithium batteries, being less than half of the former battery, hasn’t reduced the payload.
Everything is controlled by one app on either or both our iPhones and iPads. The installers have linked all the gear too, so we can see the interrelationships in real time (on slow TV nights :-) ).
All in all, with fitting, it came to £2750. The second battery was a ‘bonus’ but we now feel much emboldened about time off grid, especially in colder weather when you want the van’s heating fan to work and the van well lit. The additional battery added about £600 to the price. A lot of money but what price comfort, free from anxiety?
Thanks Neil, useful info, appreciated. Yep, we’ve had the same feedback from others who’ve gone down the Lithium Iron route. Sounds like you have a cracking system there, one day we’ll get something similar I suspect, although not on this van. Cheers, Jay
Great write up Jay, and it essentially echos our opinion. The battery pack itself is fine, but the solar panels would be a pain in the behind in our opinion. And of course all of this extra gear takes up space, whereas our current batteries are hidden away, and of course our rooftop solar panels are out of the way.
Also may bite the bullet and go lithium eventually, but waiting for the cost to get a little more reasonable. Will have a more serious look at the whole idea when we return to Germany next spring/summer.
Cheers guys, happy travels! Jay
Thanks Jay – that was very useful and interesting as ususal with your writings. We are still at the planning stage – delayed by Covid! so my question may seem very niave, which I hope you will excuse.
Why not hook up your existing solar panals (or indeed increase their output, if space is availble on the roof) instead of using their movable panels, which I agree seem a pain.
Thanks
Hi Richard
Our van’s roof is full. We could remove the satellite dish and get another panel in that way but we want to keep it. The moveable panels do at least give us the opportunity to generate more solar on pitches/wild camping spots with no power, but I’m really unsure how much we’d use them.
Happy travels when the time comes!
Cheers, Jay
Hi Jason,
Buying this :- SolarEnz MC4 to 8mm adapter cable, again from Amazon, allows you to hook up most
types of Solar Panel.
I have two J1000’s, one for the house, running IR panel radiators in our cold Kitchen, (no CH in there)
and one in my workshop running a couple of 45 watt tube heaters for the mini greenhouses’ growing
seedlings for the Veg plots. as we mostly go Motorhomeing out of season, we take one 1000 for mobiles/laptop etc.
although our kettle is only 600 watts so use it for that occasionally.
Hope this helps anyone reading.
Great review .
Best wishes.
Useful info, thanks Geoff, happy travels, Jay
We are looking at the Jackery 1000 Pro with 200w solar panel, does anyone know if you can plug this straight into your motorhome electric point and use it (carefully of course) like you do on a site.
We’ve had ours plugged into the motorhome hook-up point and used it to recharge our leisure batteries. Obviously if you’re using the 3 pin plugs in your motorhome you can’t exceed the capacity of the Jackery’s inverter. Also, although the Jackery inverter can be used while the solar panel is plugged in, apparently this reduces the life of the internal battery. Other than that it worked fine for us. Cheers, Jay
I’m using these right now and they are awesome. Cloudy uk day and the solars been generating 50-75w, just one on its own in a bit of sun yesterday was catching 130w – took 70% to 100% nicely whilst we were out for a few hours. Wish your review was after an actual roadtest as you don’t do these justice at all. I was so angry the other half spent our money on these but cannot fault!
Hi Twod. We’ve had the Jackery out on a couple of month-long trips since and it came in handy for a couples of days as one of our leisure batteries died (it was 7 years old). But being honest we’d have been fine without it (the other battery was charging fine) and have replaced both lead-acids for a fraction of the cost of the Jackery. We stayed off site a fair bit and didn’t deploy the portable panel once. The Jackery kit is top-notch quality and fantastic if you don’t have a solar-leisure battery set up in your van but (and we’ve lived in vans for years at a time) they’re daft expensive, bulky and heavy and my honest opinion stays that most folks would be better off upgrading their in-van kit. Cheers, Jay