
Fixing our Motorhome 3 Way Fridge – Gas Burner Cleaning with No Access to the Lower Vent
Our motorhome fridge refused to stay lit on gas after a journey to a campsite a few days ago. We had a problem trying to fix it as we expected the problem to be with the gas burner, but couldn’t access it as the lower vent is behind the rear bumper on our 2001 Hymer B544. Several of the bumper screws were badly rusted, and some were missing, so we’d likely need to drill some new holes and maybe grind off the tops of some older screws. It was also lashing it down and blowing a gale, so while we hunted about for another solution we used 230V hook-up from the campsite and ran the fridge on electricity instead (after a sleepless night listening to intermittent clicking!). This post explains what we did to fix it without access to the lower vent.
A Quick Introduction to 3 Way Fridges
If you know how a motorhome fridge works, feel free to skip this section folks!
We’ve an Electrolux fridge/freezer in Zagan (newer ones are badged Dometic). The fridge doesn’t work like those in the kitchen back home, as it has no compressor pump. Although a few motorhomes have compressor fridges, typically expedition vehicles with a ton of batteries, most don’t as they use big amps and would flatten your leisure battery sharpish, at least when your engine’s not running and spinning your alternator to supply the high current needed.
Instead we have ‘3-way’ absorption fridges, which can be run on gas when we’ve no hook-up available (or we want to be ‘off-grid’). The absorption bit means it uses two coolants, one of which evaporates to draw heat from the fridge, and is then absorbed into the second coolant. It’s a bit weird for a device which cools things, but a heat source is needed to drive the cycle, which is where the ‘3-way’ bit comes in. The heat can come from either (a) a gas burner (b) a 230V heating element or (c) a 12V element. The latter is deliberately wired so it’ll only work while the engine is running, again to save your leisure battery(ies).
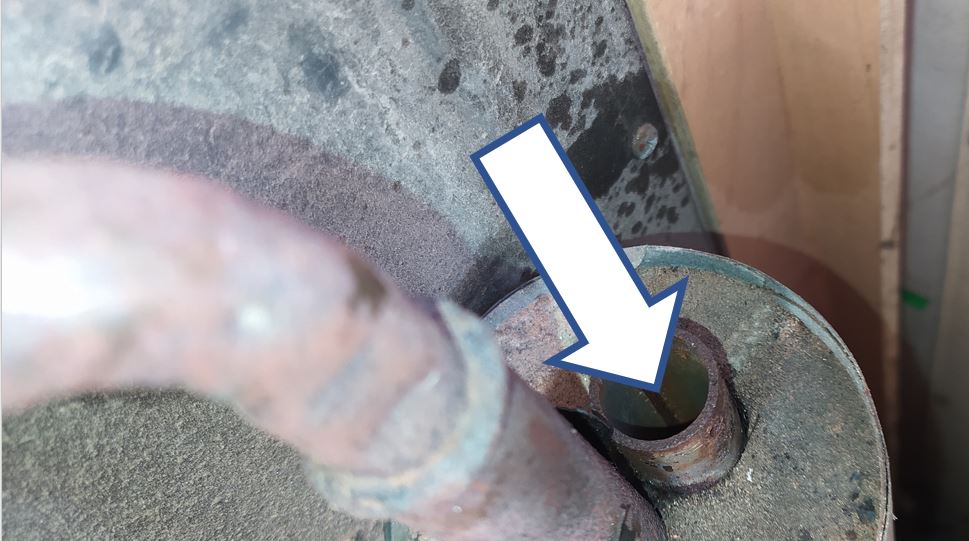
As our fridge works fine on 230V and 12V, and was working fine on gas, we know the coolant system is working OK – no need to take the fridge out and turn it upside down, phew. The problem was clearly with the gas burner. This sits at the bottom of the fridge, accessed via the lower of the two plastic vents you see on the outside of motorhomes and caravans. Opening the vent you”ll to find a metal burner shaped a little like a tobacco pipe. Inside this is a small metal dome with a tiny hole in it – the jet – from which gas emerges. By pressing the knob on the fridge, gas is allowed to flow while a piezoelectric spark fires. When this lights the gas (which can take a daft-long time if the fridge hasn’t been used on gas for a while), the flame heats up a thermocouple sticking into it, which keeps the gas flowing automatically unless the flame goes out (at which point our fridge will try to auto-relight it for 30s, then give up and the gas turns off). When it’s working properly, the fumes from the flame rise upwards through a metal flue pipe and out of the top plastic vent. I sometimes put an ear to the top vent and listen for the slight roaring noise, so I know we’ve a good flame.
Anecdotally (and from personal experience), the main issue folks have with the gas burner is a bit of rubbish getting in front of the jet and disrupting the gas flow. This results in either a small flame (so it keeps going out and has to be relit) or none at all (so it just won’t light). We’ve also managed to douse ours in water before when cleaning the cooker above, but we’ll forget that incident for now! The dirt could be some soot, a dead spider, cobwebs, rust, dust, that kind of thing (it’s a really small hole).
Fixing the Gas Burner from the Top Vent
People usually manage to fix the problem by taking off the lower vent and using either canned air or a compressor to blow the dirt out. It’s quick fix if it works, and doesn’t require any new parts (people generally advise against poking anything into the jet hole, to avoid damaging it). Our problem was the fact we couldn’t directly access the burner, but a few helpful folks pointed out we can access it from the top!
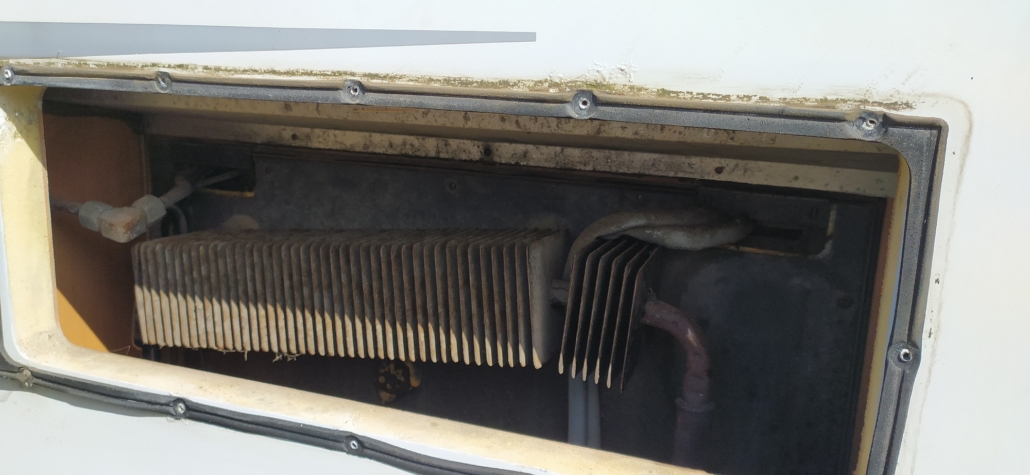
Once we decamped from our site and headed to the nearest Sainsburys, Ju went to get food while I nipped to a hardware shop, got masked up (if you’re reading this in the future this wasn’t a mask to rob the place, but is a standard requirement in the summer of 2020 due to the covid-19 pandemic) and bought a metre of flexible see-through pipe for 90p, about 1cm in diameter. Back at Zagan I took off the top vent, including the surround to make it easier to get at a screw (the surround isn’t glued on, I just needed a screwdriver). The flue was cold as the fridge has been running on 230V, so I didn’t need to let it cool off. With the top of the flue and the twisted baffle lifted out (which is just hooked into the lower part of the flue to slow the fumes down), I popped the pipe, taped to the end of our 12V hoover, all the way to the bottom. At this point it should be close to the burner jet.
Having hoovered it out, the fridge still refused to light, perhaps because it’s not the strongest of suctions. I had a go at blowing down the pipe instead, using the power of the old lungs alone. I could see water vapor from my breath being blown down the pipe after a few goes, so I gave up on that one to avoid getting the sparker wet. The fridge still wouldn’t light. Next up, bring on the van’s the foot pump! I removed the end of the pump pipe which normally attaches to the tyre valve, which let me feed the pipe down the vent. It wouldn’t go all the way, but may 2/3rds down. I squeezed it shut by hand and a small amount of dust flew out – encouraging. After 10 or 15 ‘blows’ I tried the fridge. One *click* and it lights, and stays lit. I turned the gas off and tried it again. Worked again – whatever was blocking the jet has shifted!!! A small celebration erupts in Saino’s car park (involving Ju as she’d returned to find me taking the van apart).
I’ve tried it three times since and it lights first time (hooray!!!!), so I’ve refitted the top of the flue and the vent. We’re on site with mains access included in the pitch price for the next ten days, so the gas is a back-up for now. I’ll sort the back bumper out when we get home with new screws (with a dab of silicon on them when re-fit them to avoid them rusting up in future – another good tip I gratefully received).
Cheers, and thanks to all the help we got from the Hymer Owners Group on Facebook, Jay


")


Ha! Nice job with the foot pump! I really doubt that you need any parts… just a proper cleaning.
Cheers Kevin – gotta love some low-cost DIY success eh?! Jay
Hi, Very good detailed account thank you.
We had the same problem this week, on our Dometic fridge, not working on gas.
Looked at it, then did a search on youtube, then rang a couple of local mobile M/H guys. Well sit down, one said new a new burner at £150!, next said new jet at £25 without seeing it. Due to them being fully booked for weeks on end, looked at it myself. Simple job, used my airline on the burner, no joy, took the disc of a jet out and bingo looked a bit blocked. So with a very thin strand of copper wire cleaned it out. Result working again and saved £xxx. I have read in MMM that lpg gas from an underslung tank may not be as clean as bottled gas.
Richard
Nice one Richard! ✊👌 Cheers, Jay
Hi Richard , just read about trying to get gas working on fridge and going to try using air pump . Your way of solving it sounds something else to try but I don’t understand .. could you give me some more detail please..
If, in the end you do have to take the fridge out to clean the burner you will find that the jet is indeed very small. If you strip a piece of fine electrical flex just one strand of the copper wire can be used as a ” pricker” ( old primus stove Tec!) The copped being comparatively soft will clear the blockage without damaging the jet itself.
While you have access also clean as much of the accumulated dirt out of the ‘ chimny’ as this is usually the source of the problem.
Thanks John, all good advice. I took the rear bumper off in the end and changed the burner, jet and ignitor. I cleaned the chimney out, repaired a small crack in the plastic condensation holder and repainted the metal pipe underneath it. It was all pretty dirty in there, with flakes of rust and (no doubt) plenty of sand and fine dirt from Morocco. I’m amazed the fridge carried on working so well, but it’s sorted now. Awkward job, not much room to get a hand in, especially when trying to reconnect the new burner ignitor cable. Cheers, happy travels, Jay
Hi asking for my 82 year old dad he lost the small cap on top of the burner , I ordered him a new burner, we fitted it but can’t seem to keep the small cap on , when we try to light it , the cap blows off
Any ideas ?
Any help much appreciated